Tracking the center of mass of any kind of animal with ZebraZoom's deep learning based tracking
Please contact us at info@zebrazoom.org if you need help!
Create a training dataset on RoboFlow
Uploading images
First create an account on RoboFlow
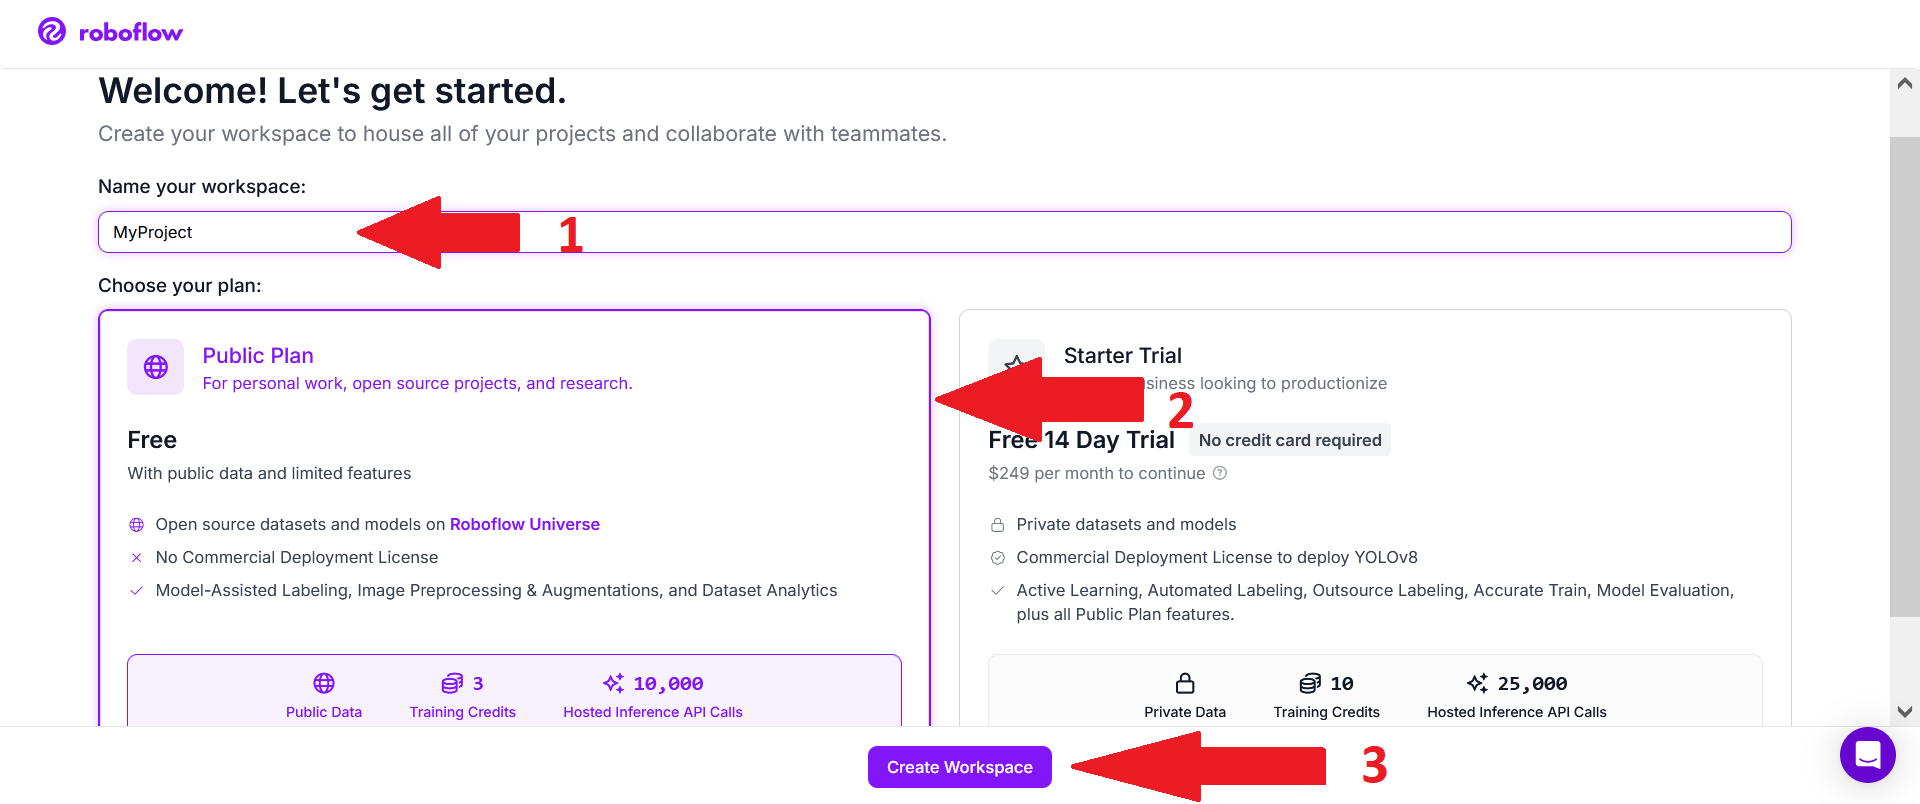
Then choose a name for your project (1), select the free Public Plan (2), and click on "Create Workspace" (3).
Then add teammates if you want help with labeling.
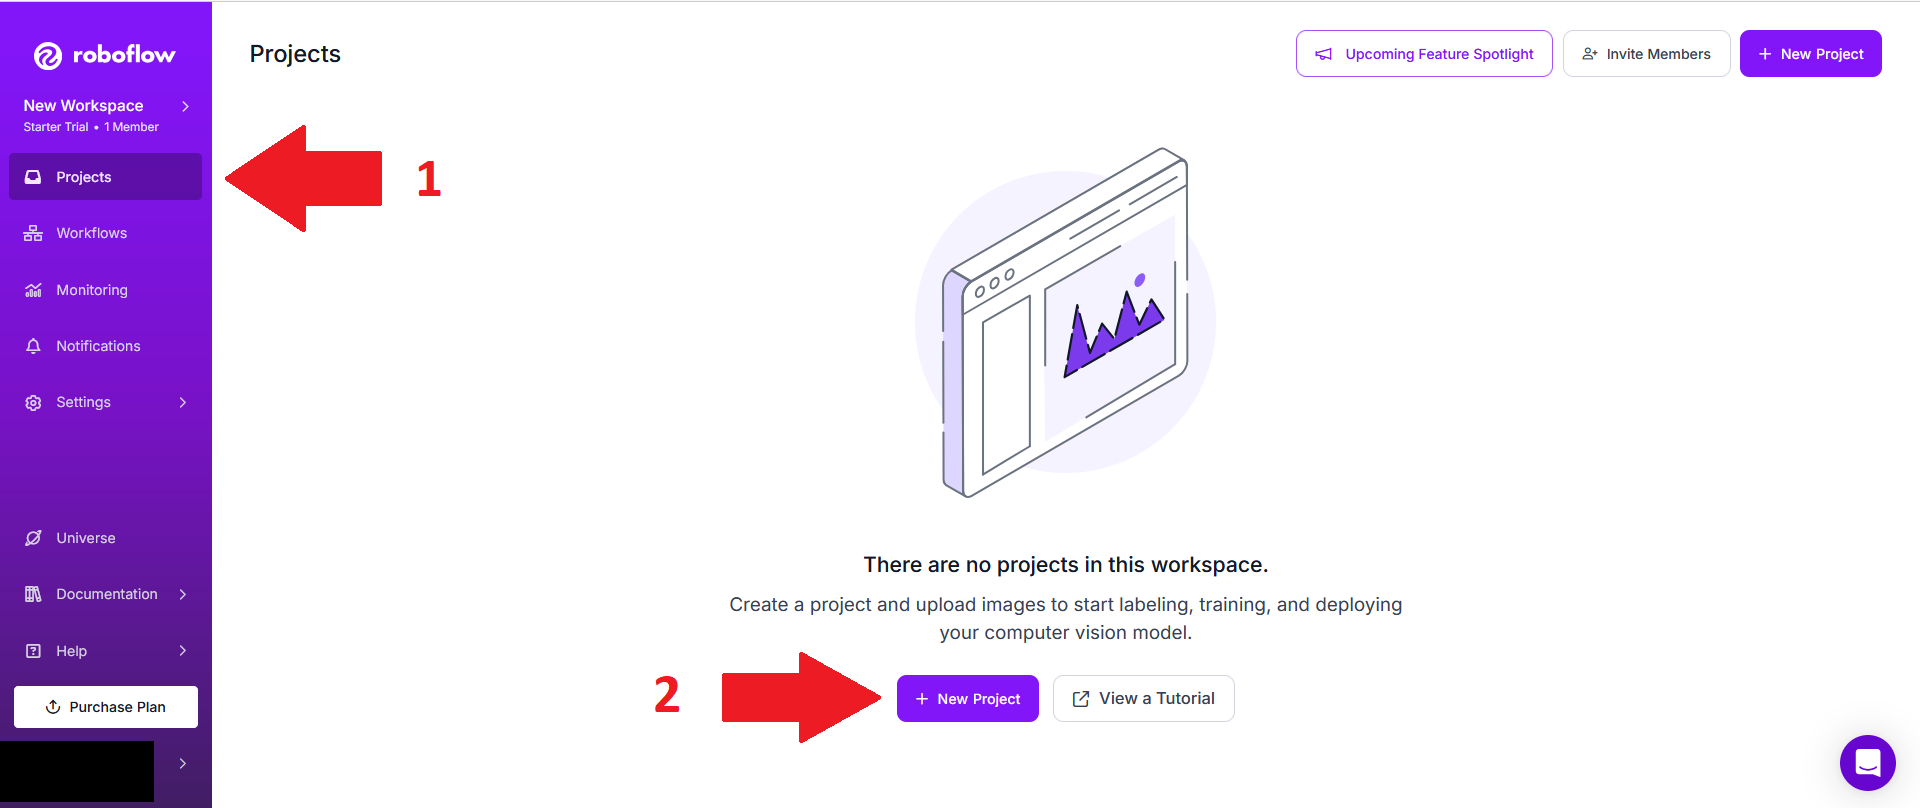
Go to the project section (1), then click on "New Project" (2).
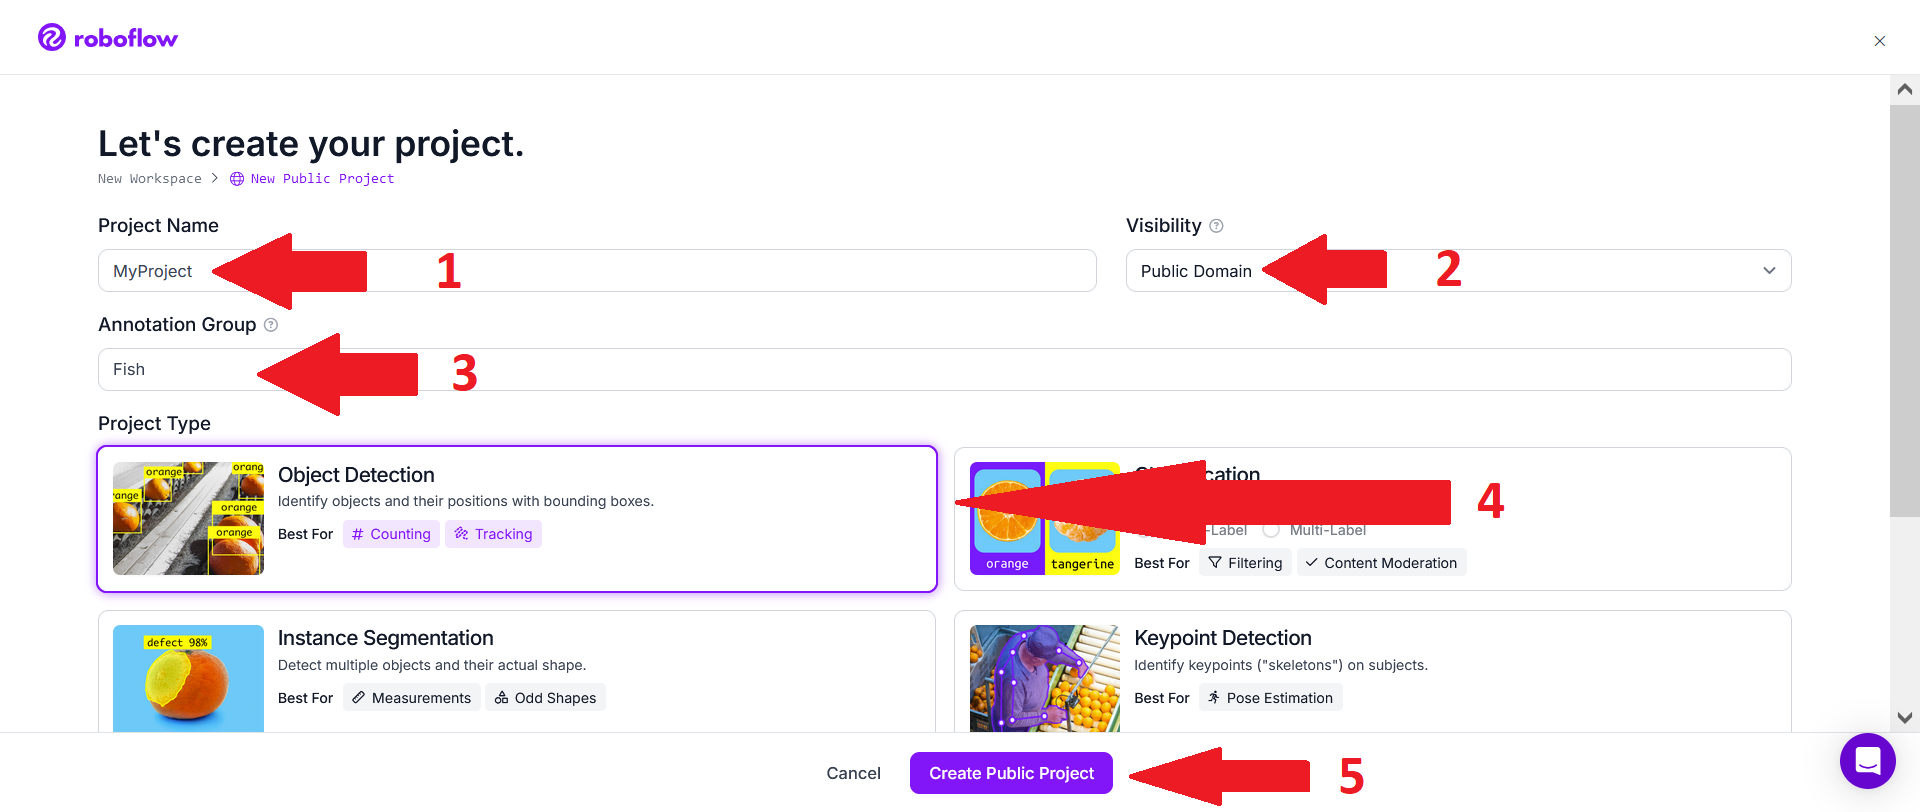
Choose a project name (1), choose "Public Domain" for visibility (2), set Annotation group to the type of animals you want to track (3), keep "Project type" at "Object detection" (4) and click "Create Public project" (5).
The simplest option is then to click on "select file(s)".
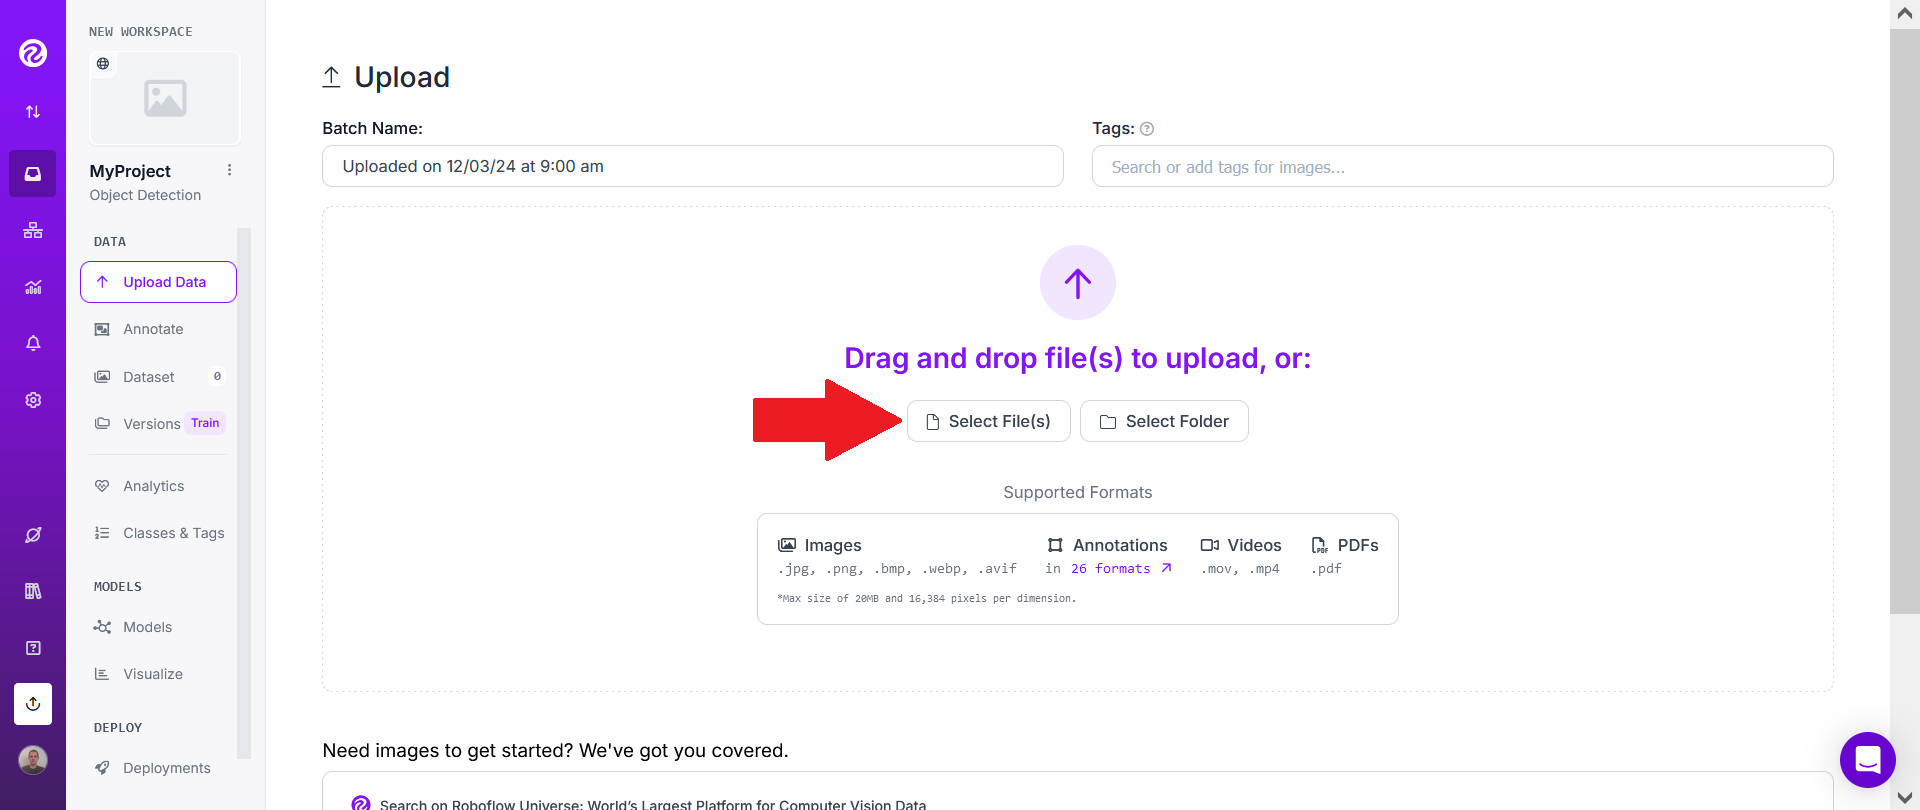
Then choose one or several of the videos you want to track.
Depending on the size of the video(s) you chose, you may need to wait a few seconds or minutes.
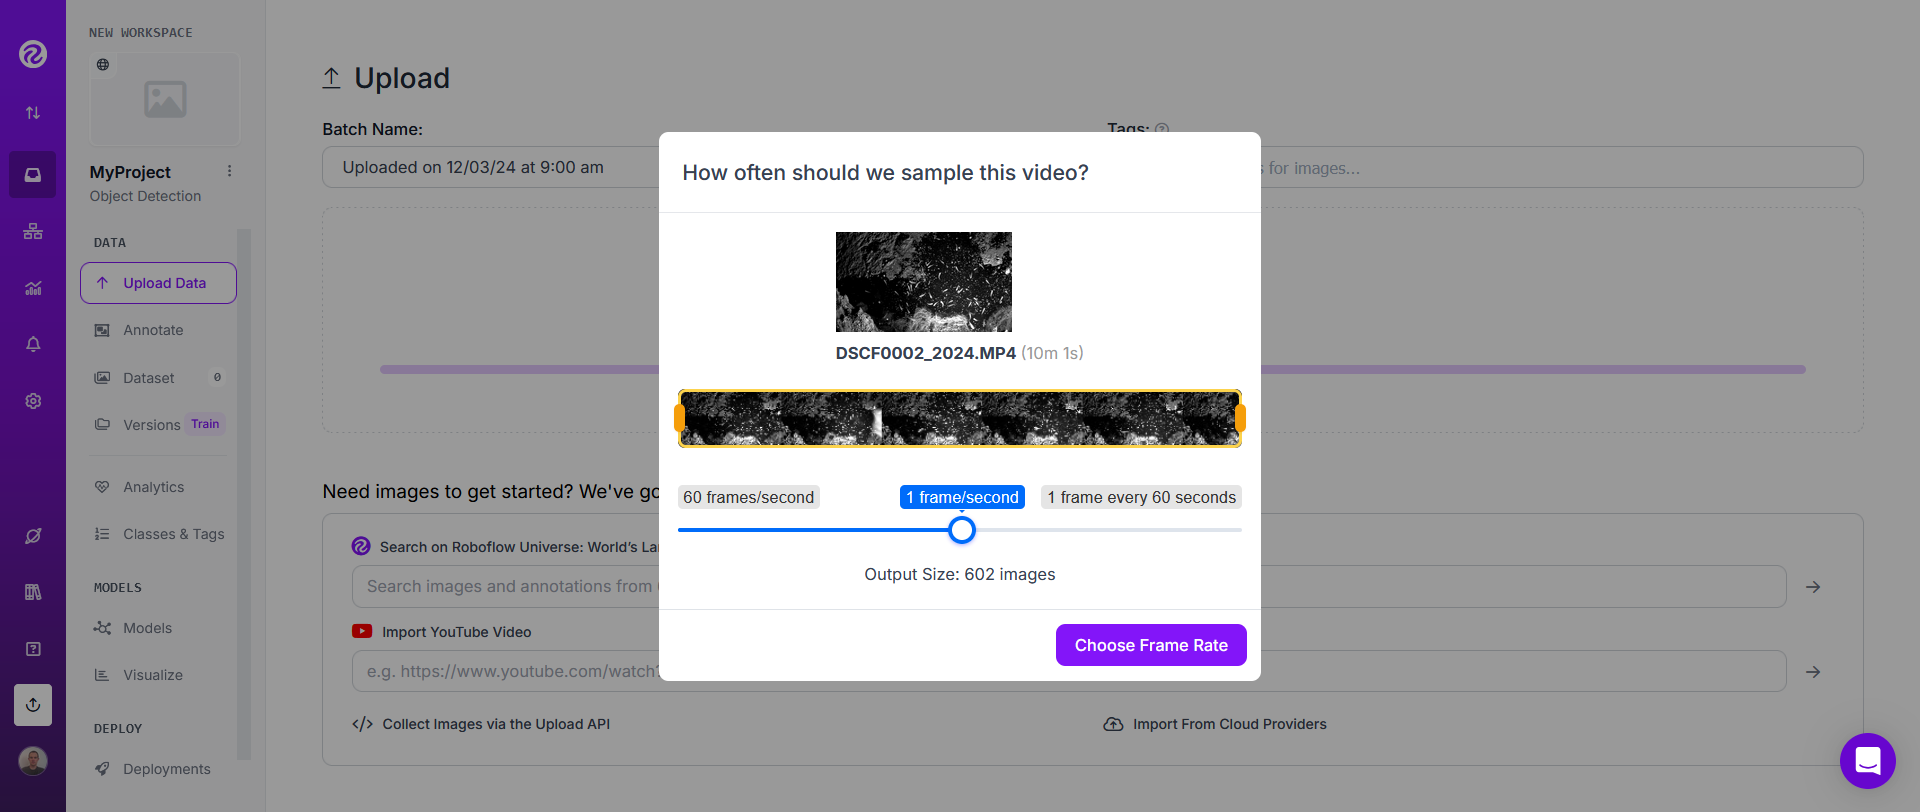
Then use the slider to choose the frame rate in order to get a good output size. Aiming for a total of about 100 to 200 images total may be a good initial choice. Therefore, if you choose only one video, adjust the frame rate in order to get around 100 to 200 images. If you choose for instance 3 videos, adjust the frame rate to get around 100 / 3 to 200 / 3 ~= 33 to 66 images.
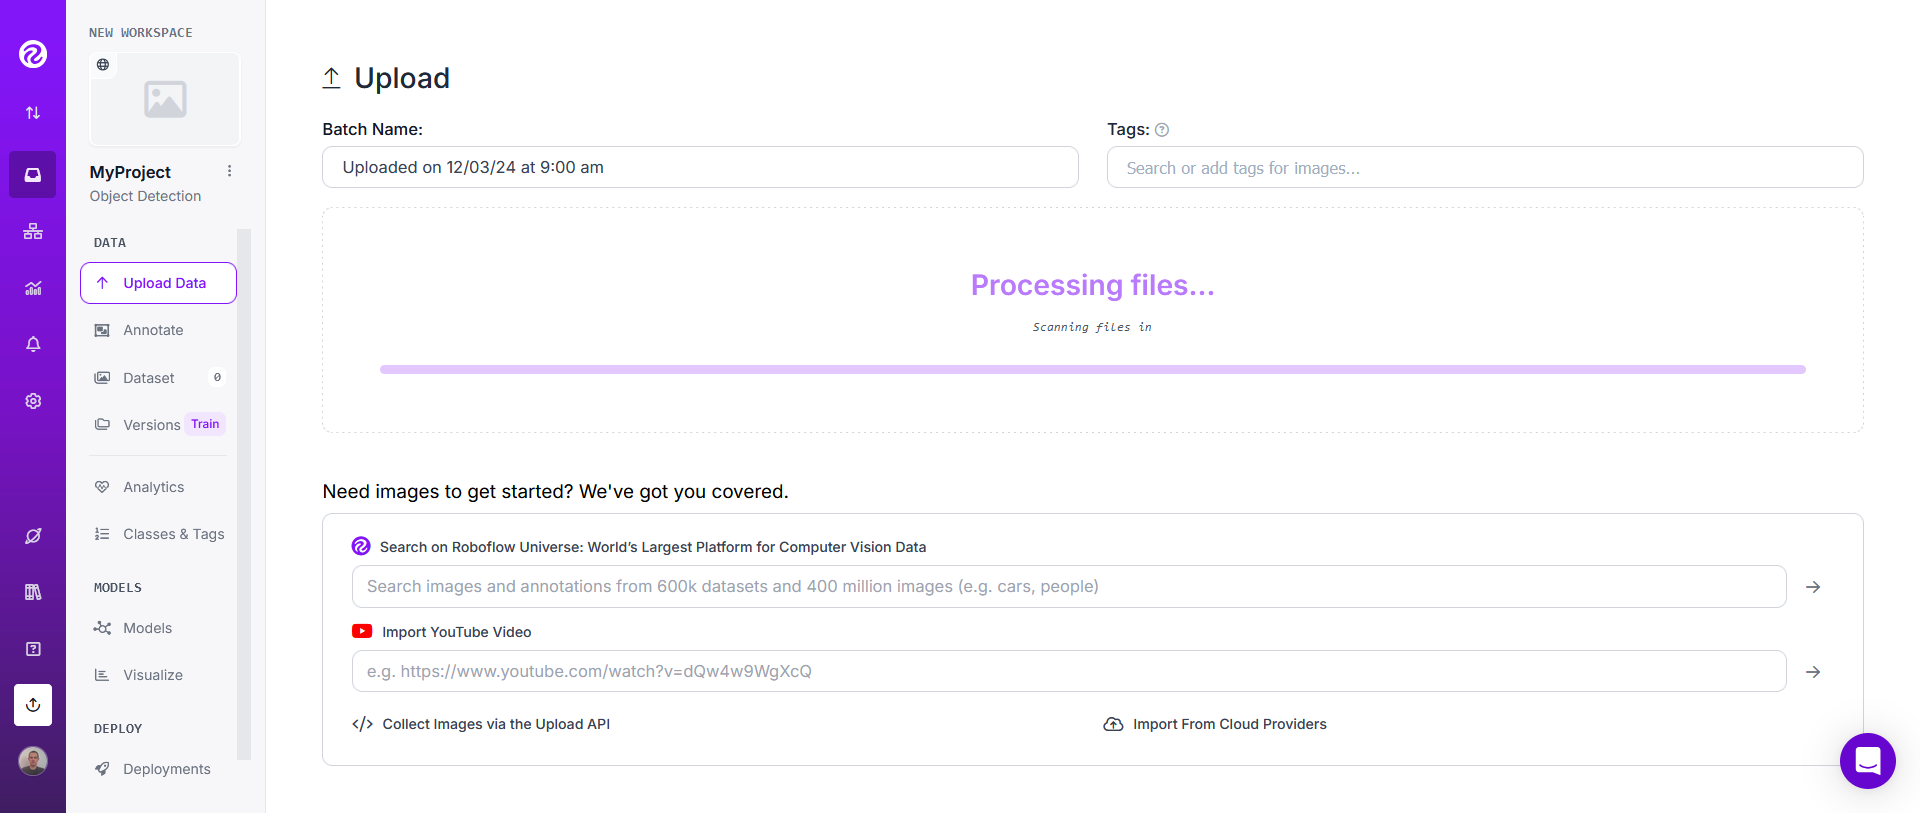
Wait a few seconds or minutes in order for RoboFlow to extract frames.
This process will repeat for each video you uploaded to roboflow.
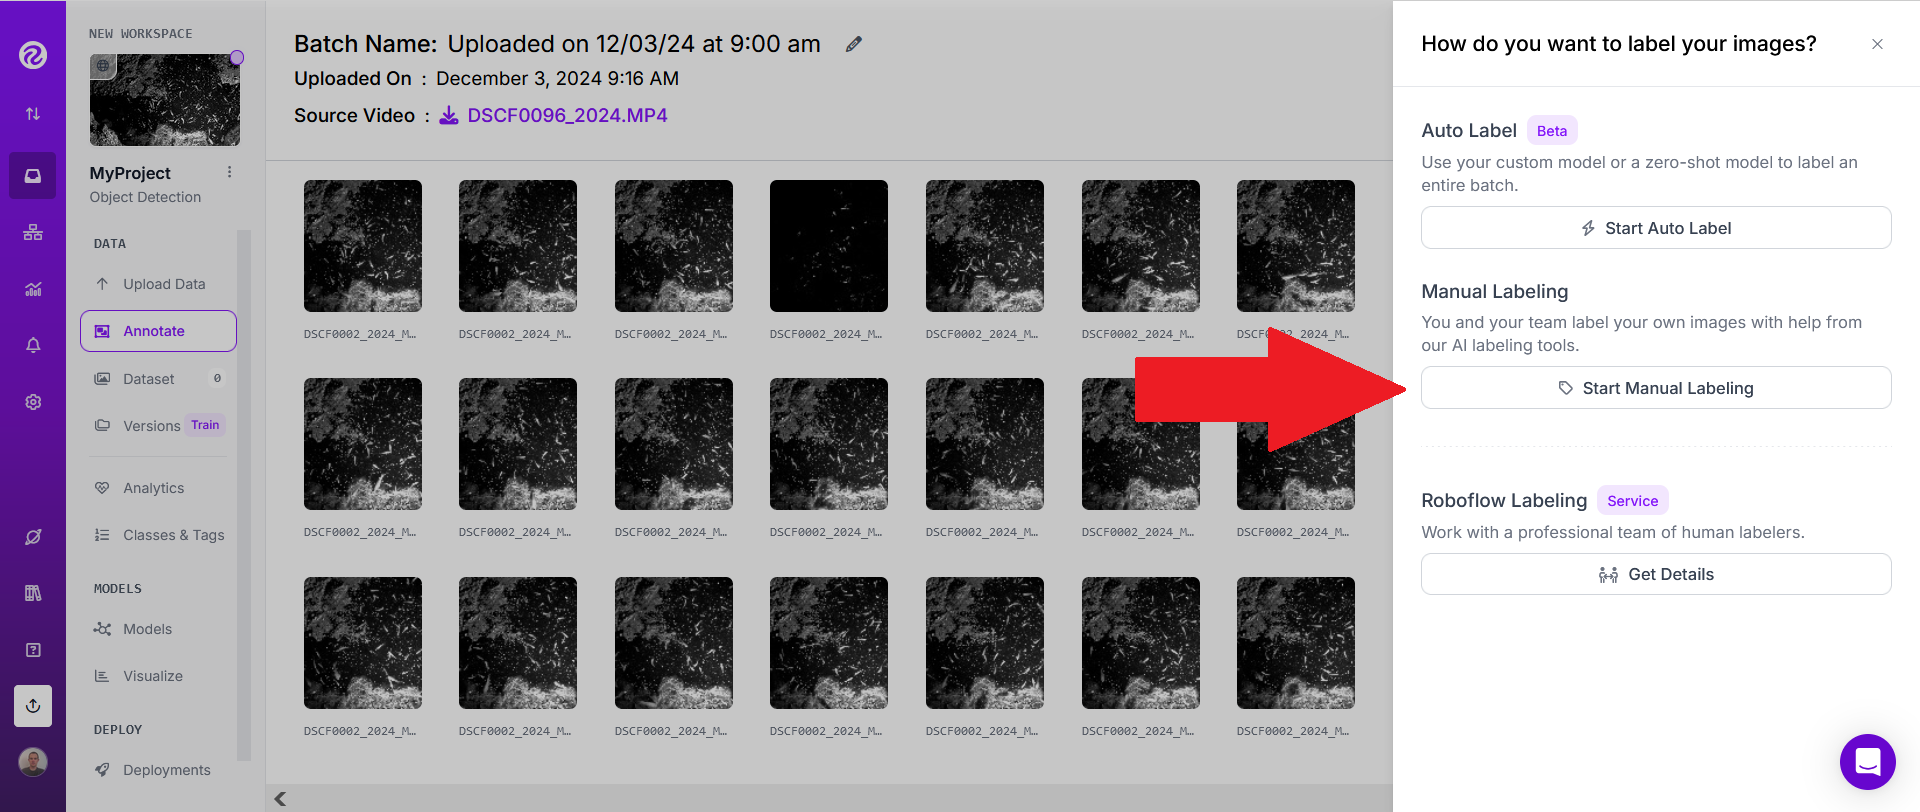
When all videos have been uploaded, click on "Start Manual Labeling" and assign to yourself and/or to teammates.
You can now move on to labeling images.
NB: in some cases, instead of uploading video(s), it may sometimes be better to upload images extracted from videos. This can be done for example with this script: image extraction script.
Labeling images
If you've just finished uploading video(s) yourself following the tutorial above, a labeling job will have already been automatically selected, so you can directly jump to the next screenshot.
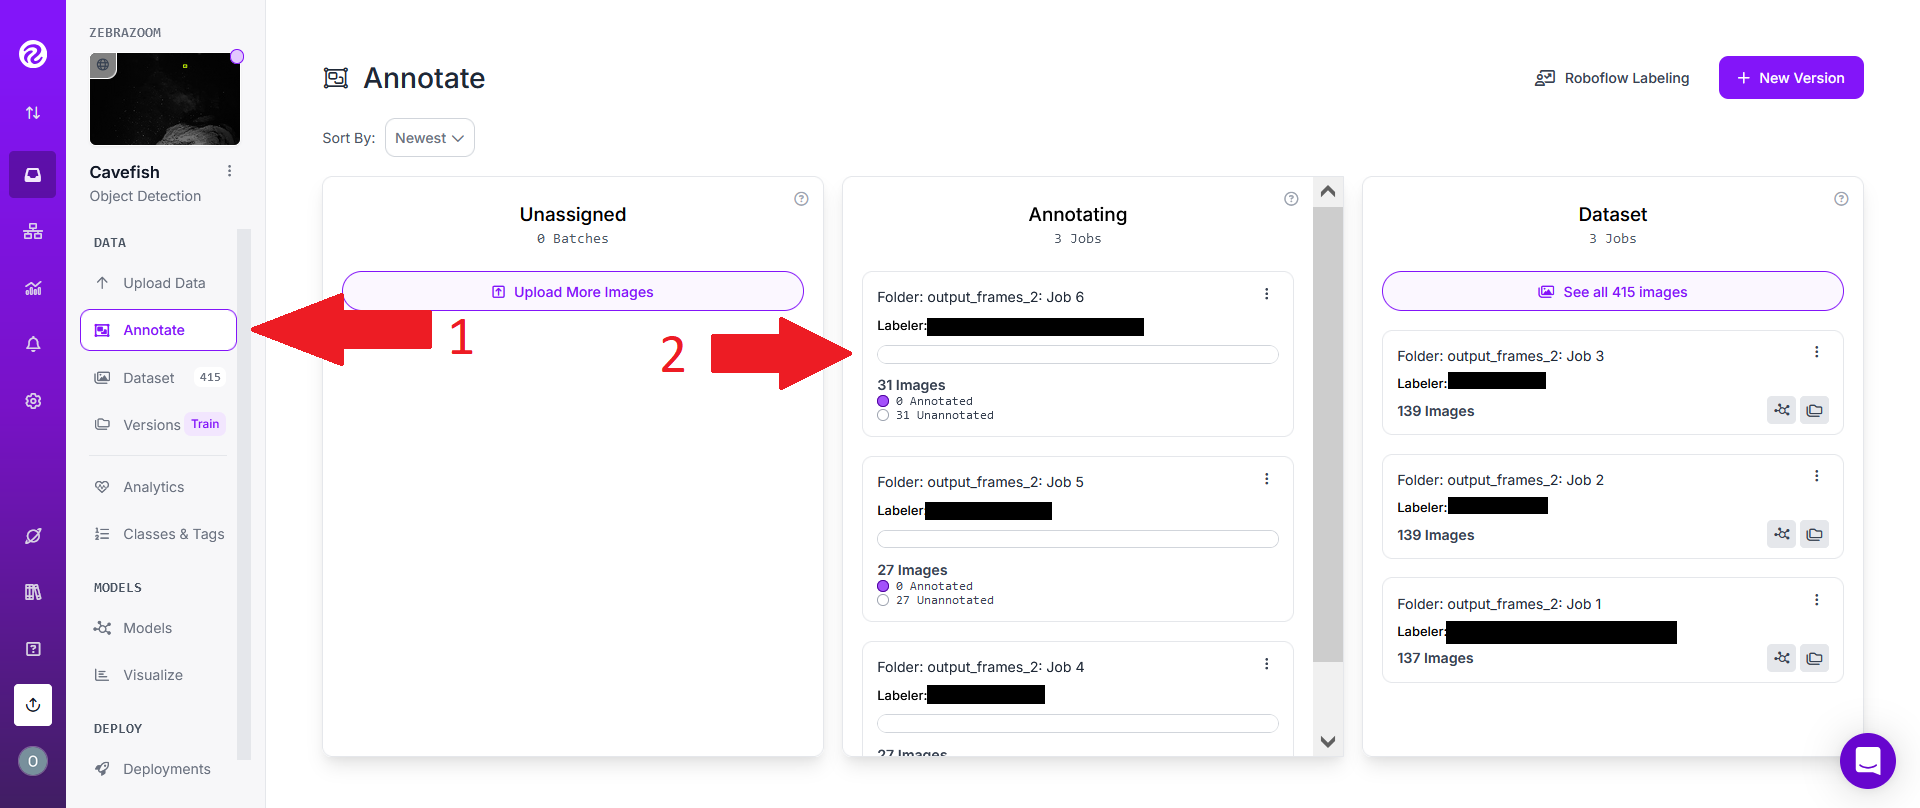
However, if someone has invited you to a project, you will first need to click on the "Annotate" tab on the left hand side of the screen (1). Then select an annotating job (2).
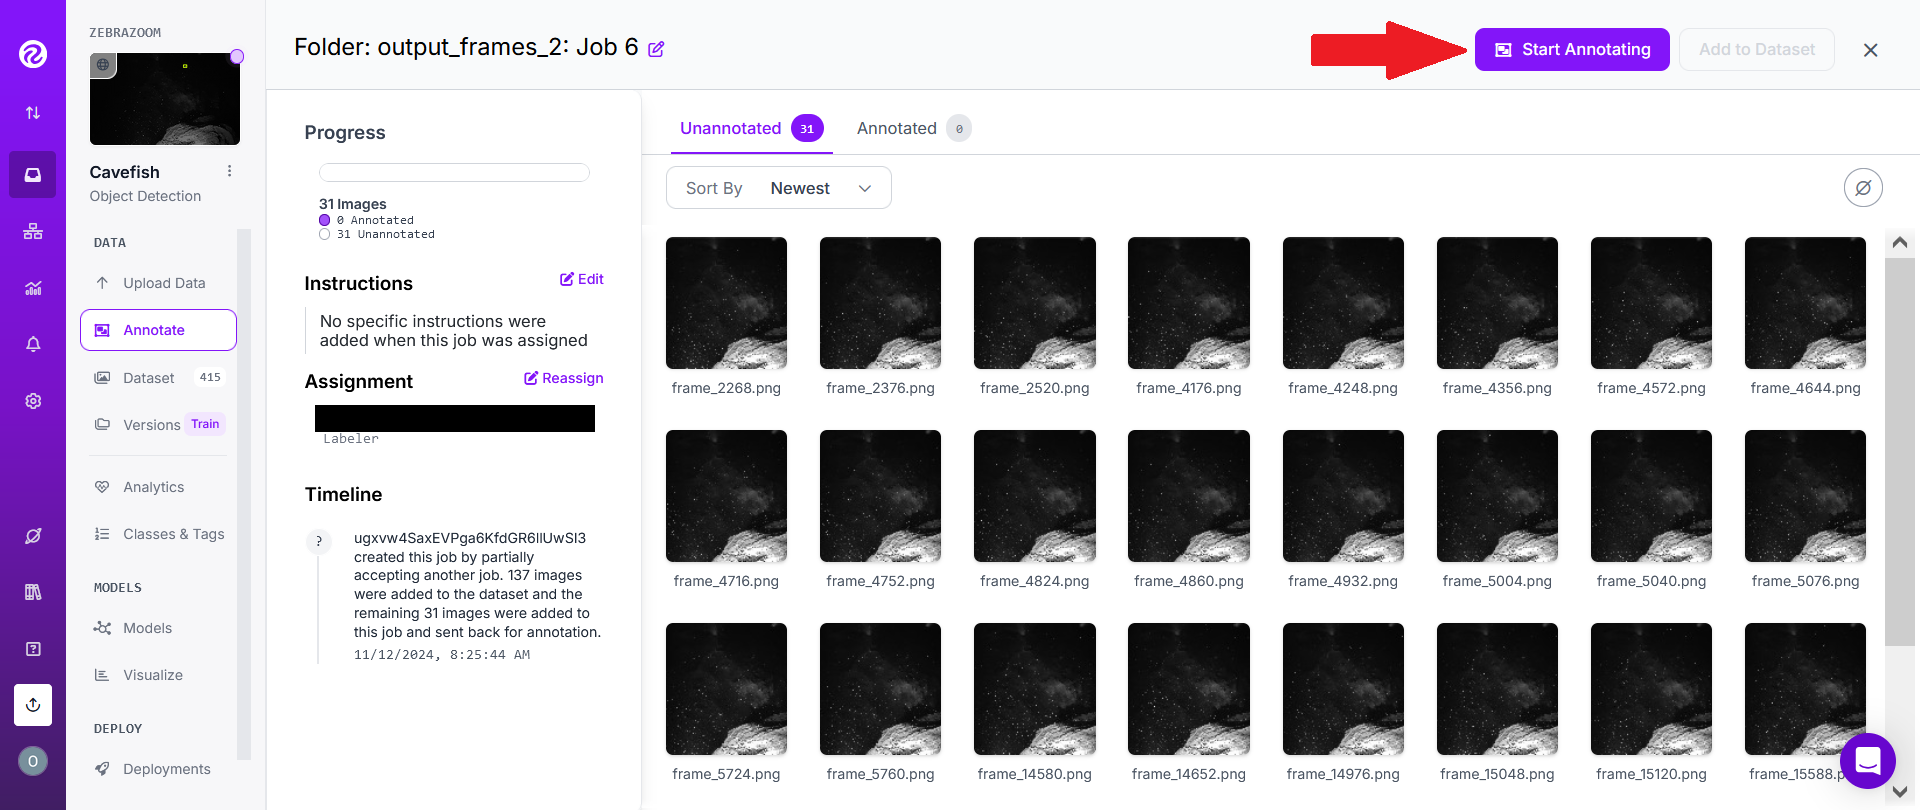
Click on "Start Annotating".
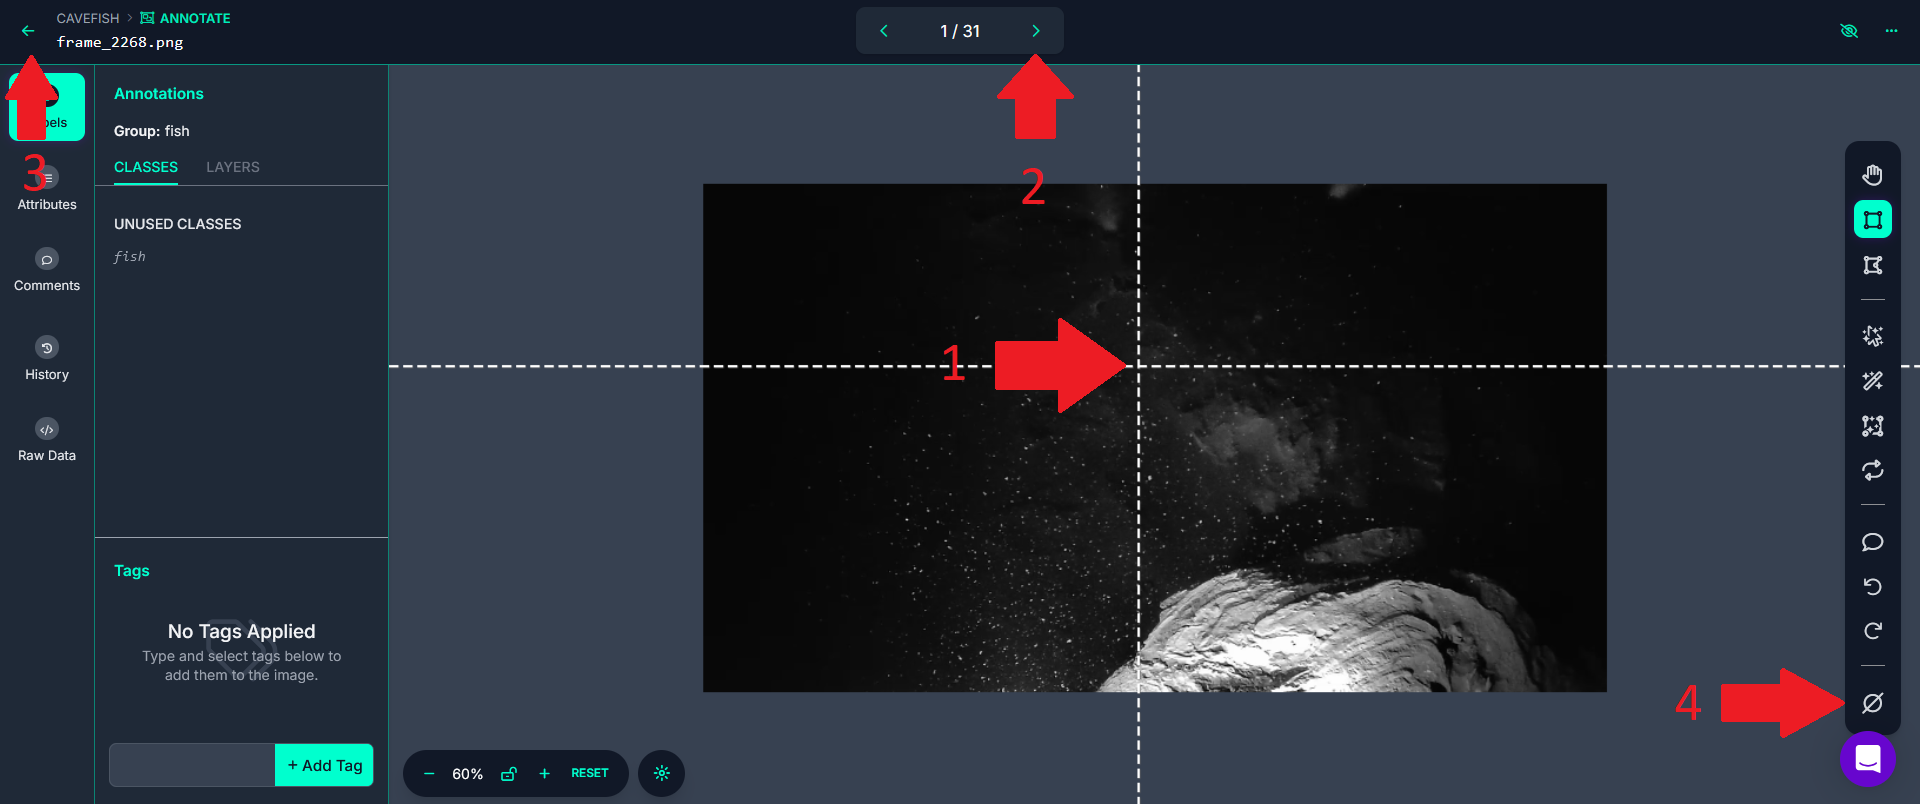
With the cursor on your screen (1), select rectangles englobing animals you'd like to track in the image. Do NOT draw anything else than rectangles (no polygons, etc...), ONLY RECTANGLES (if animals overlap each other, draw overlapping rectangles). You can zoom in the image if necessary. The rectangles must absolutely englobe the full body of the animal. However, it is NOT a concern to set rectangles a bit "too large" (englobing the animal plus some extra background pixels), what's important is to avoid defining rectangles which would be "too small" (not englobing pixels belonging to the animal).
Whenever possible, try to draw rectangles around all animals in the images. However, if an image contains a large number of animals, it's perfectly fine to miss many of them.
Once you've finished annotating an image, move on to the next image with the right arrow on the top of the screen (2).
Once you're done annotating images (you don't need to annotate all images all at once), click on the left arrow (3).
NB: Each image you pass through will be considered as having been annotated. If you wish to mark it as unannotated, click on the button (4) then choose "Mark Unannotated".
Important: It will all depend on the complexity of the video(s) you want to track, but in many cases, labeling as few as ~50 animals on ~50 different images (sometimes even less) may be enough. However, you should make sure that all the images you label look as different as possible to each other. As written above, each image you pass through will be considered as having been annotated. So if subsequent images look too similar to each other, it may sometimes be better to go back to the list of images (red arrow 3 above) and then selecting another image to label from the list to avoid annotating subsequent images that look too similar to each other.
Creating a dataset
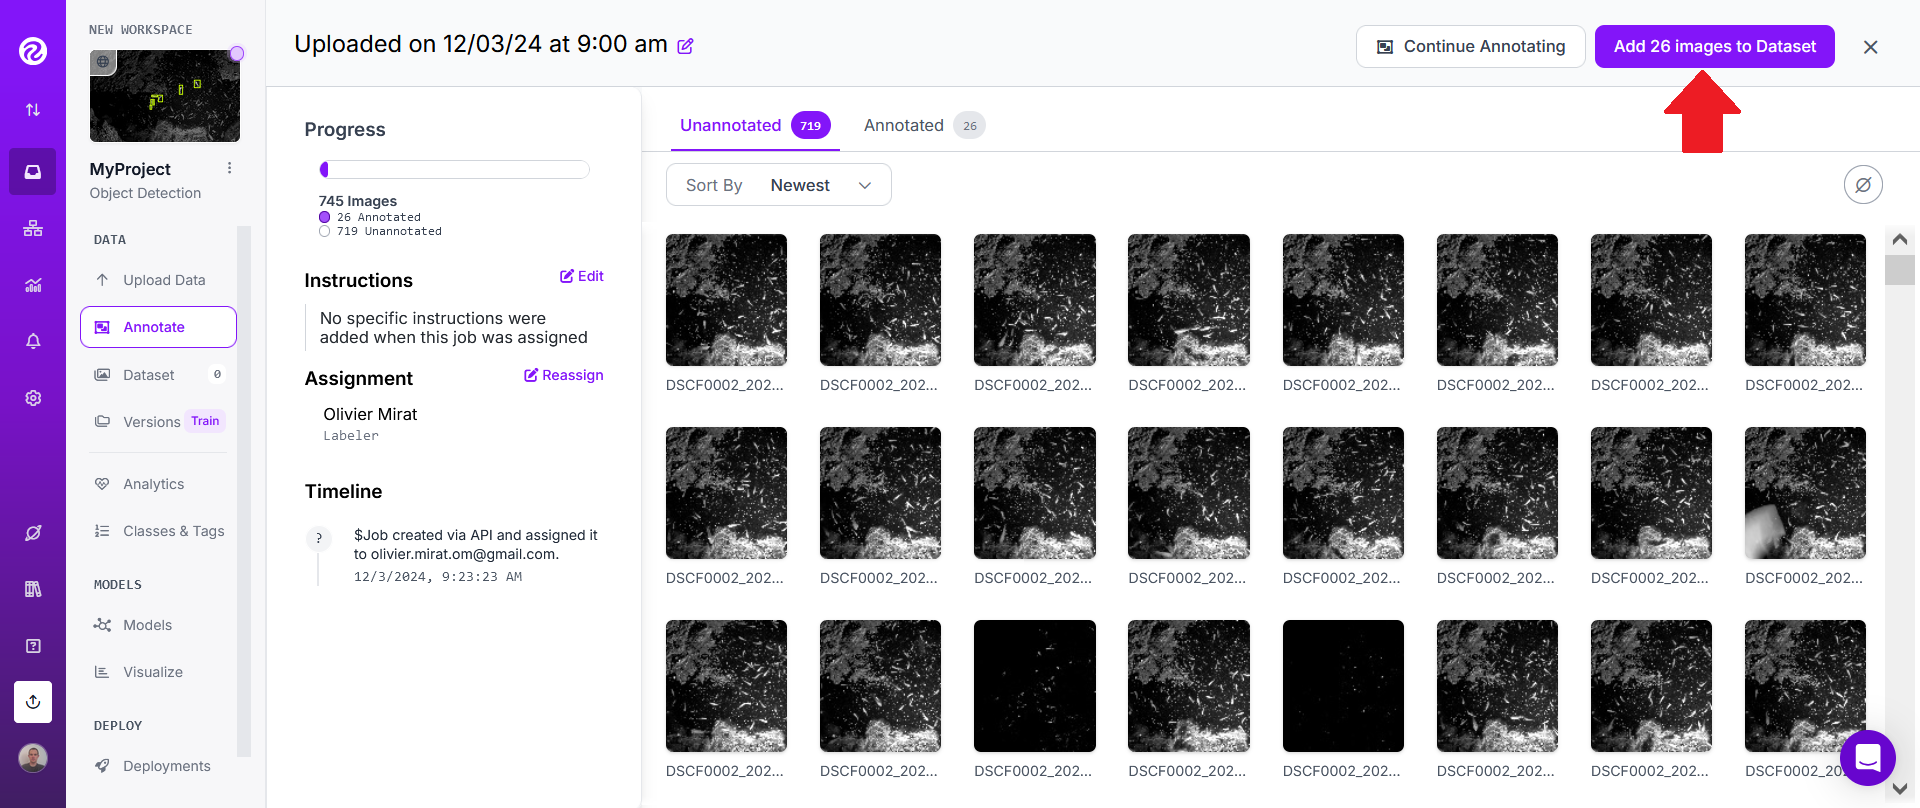
Once you've labeled enough images, click on "Add N images to Dataset".
Keep the default "Split Images Between Train/Valid/Test" method and click on "Add images".
Then click on the "Dataset" tab on the left and then on "+ Generate Version".

For "Preprocessing", don't add any "Preprocessing steps" and instead directly click on "Continue".
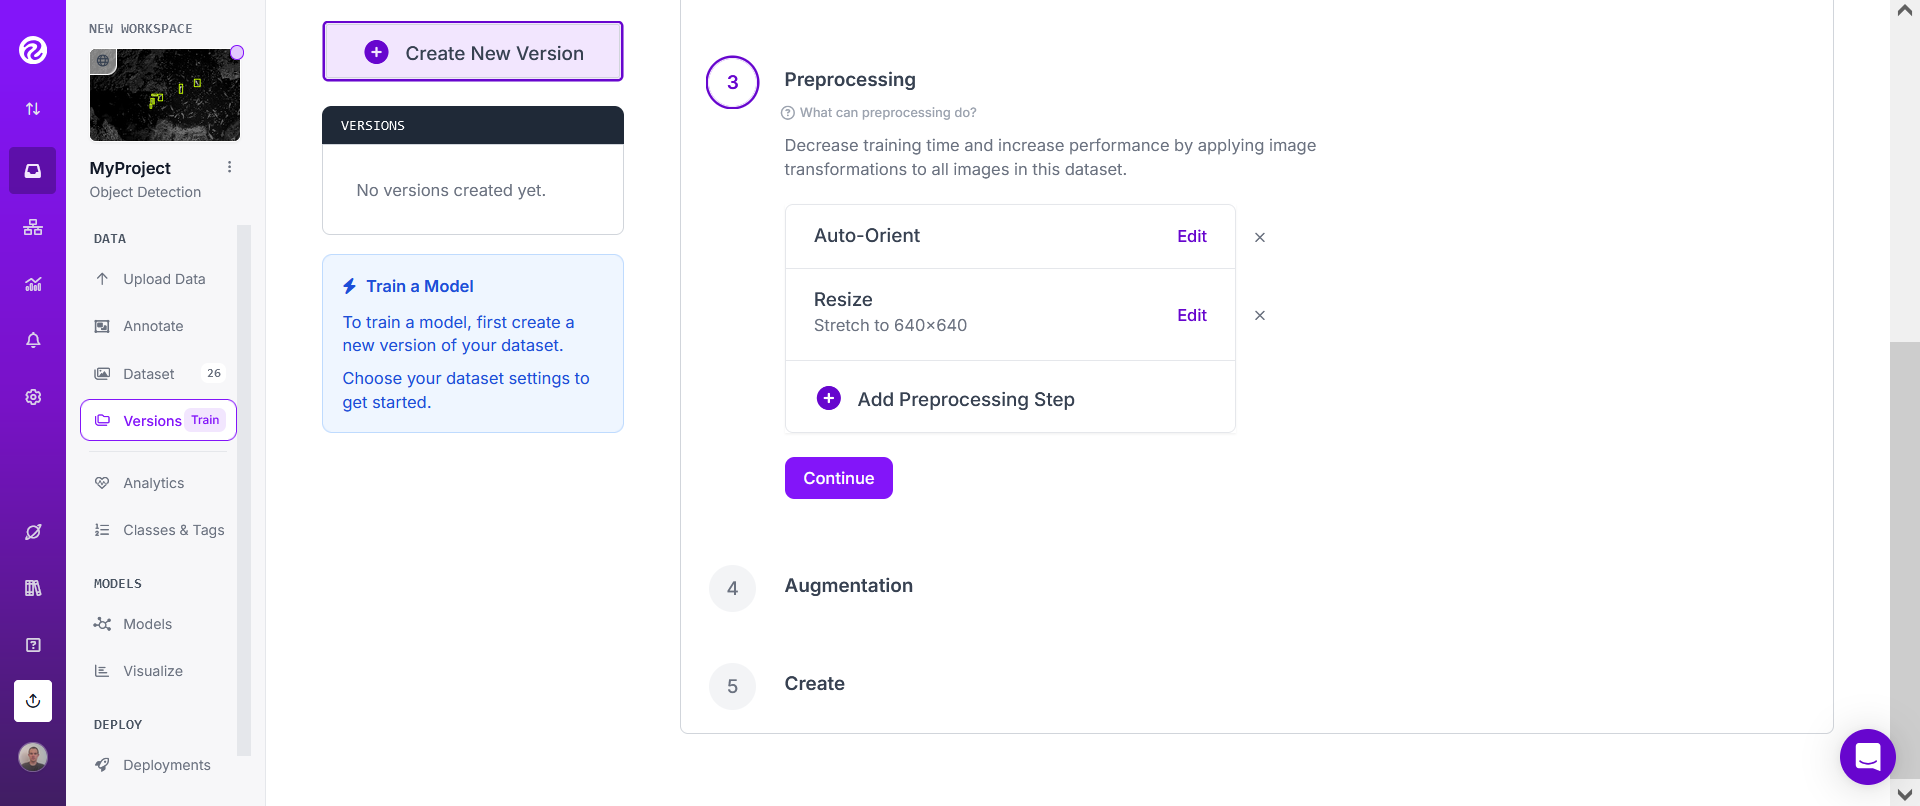
In most cases, you should however add some augmentation steps.
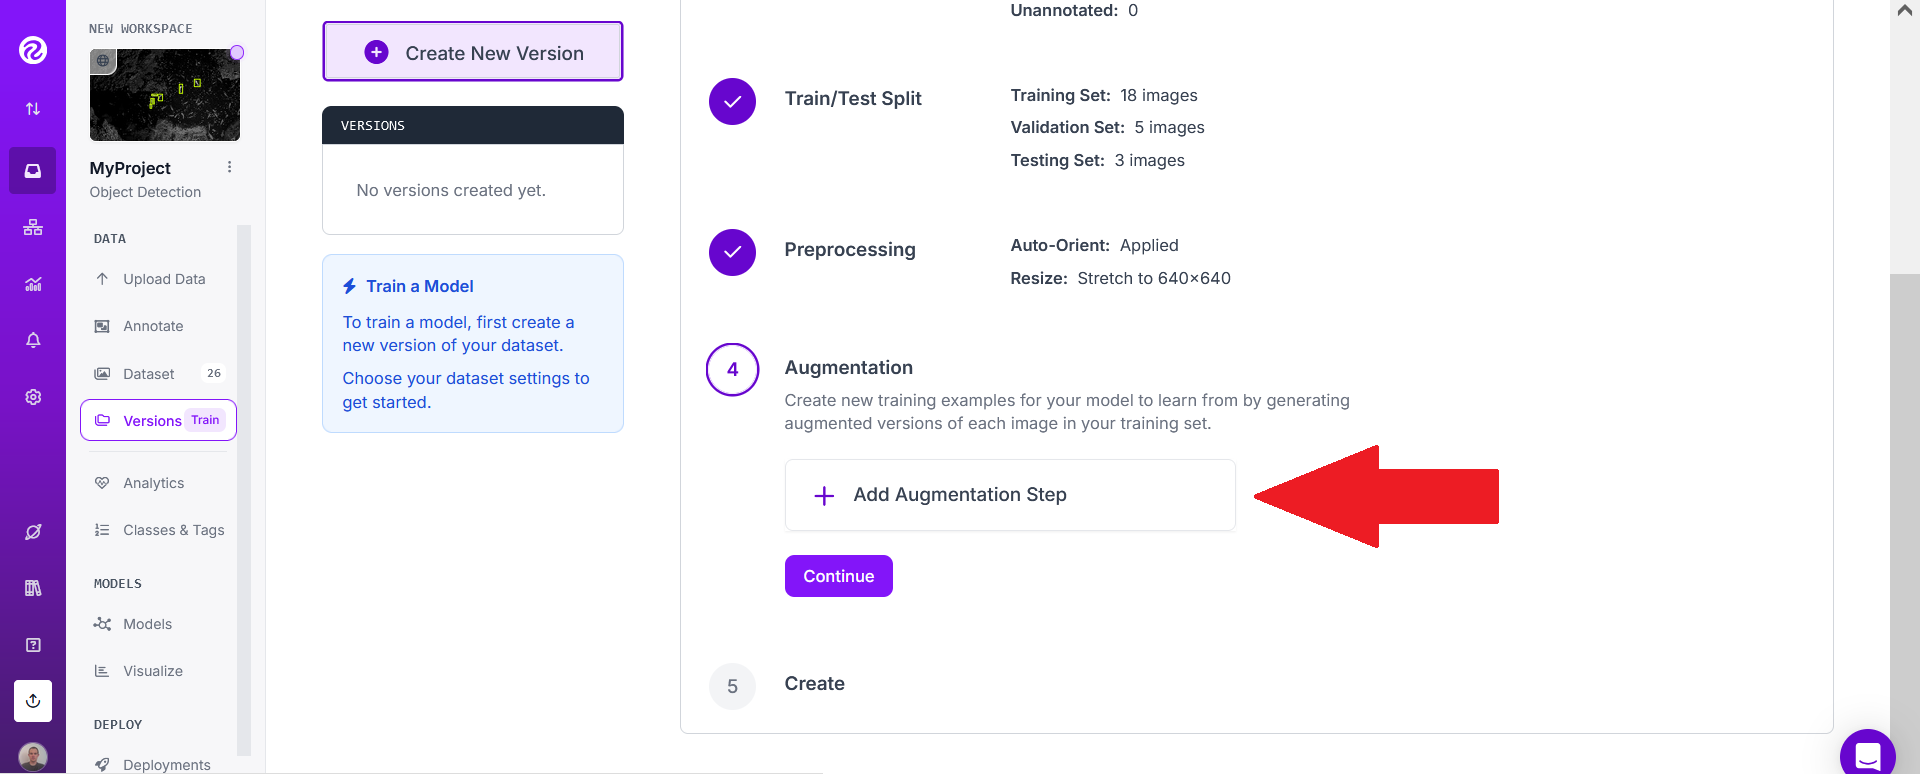
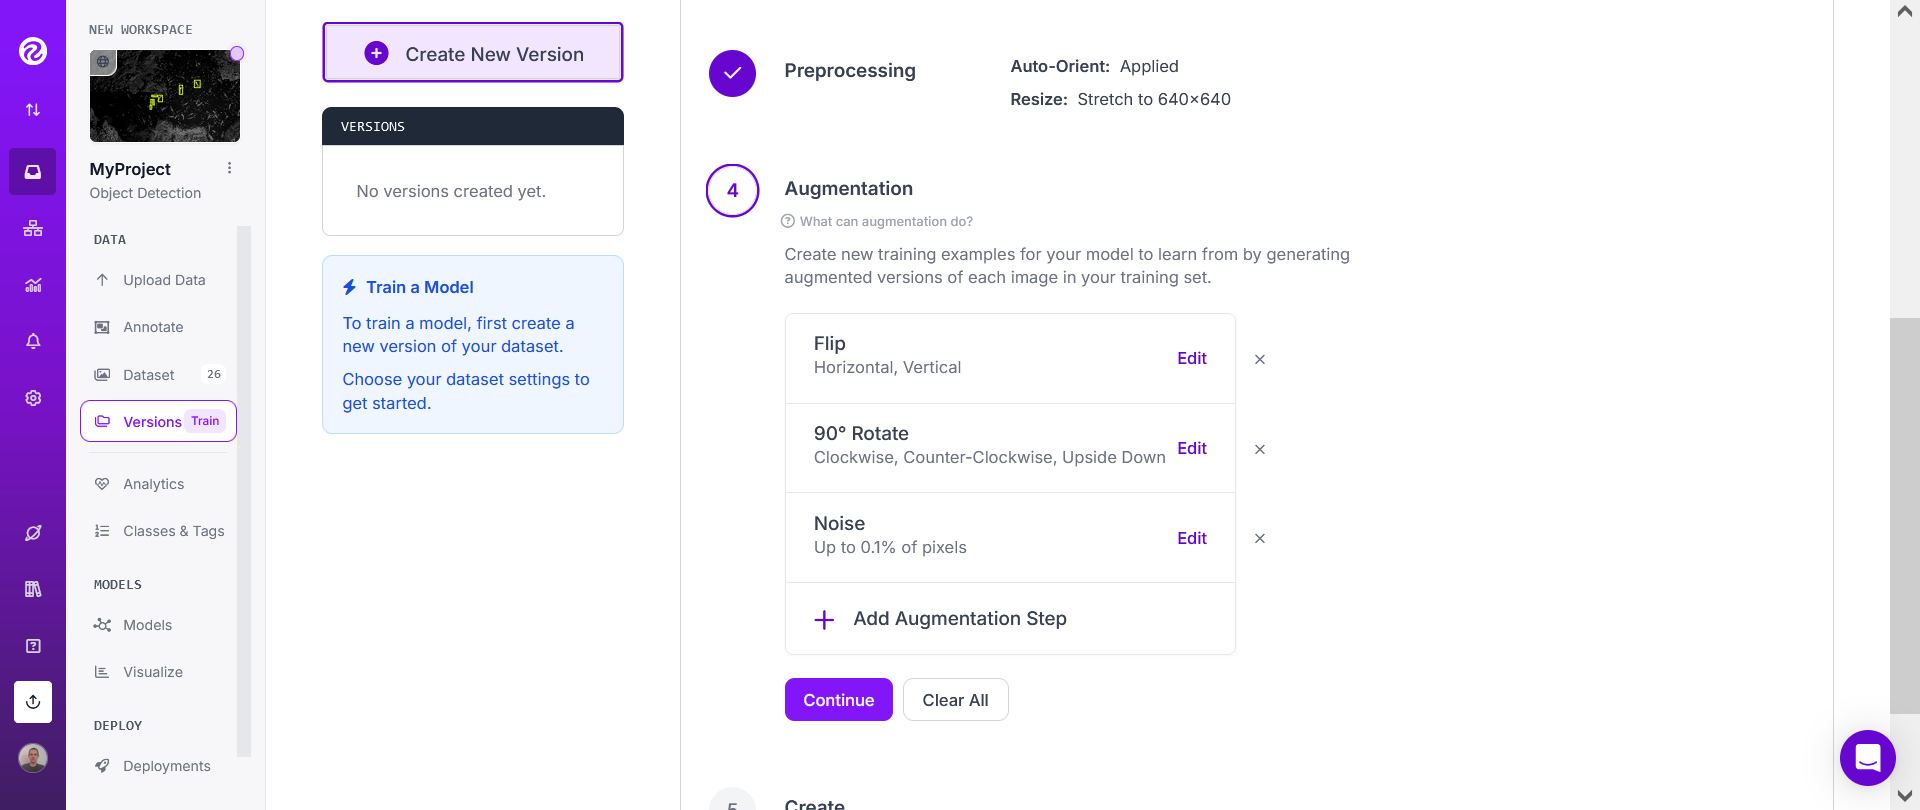
Choose the "Flip" both "Horizontal" and "Vertical", then the "90 degrees rotate" ("Clockwise", "Counter-Clockwise" and "Upside Down". Adding some noise may also often be useful.
Then click on "Continue".
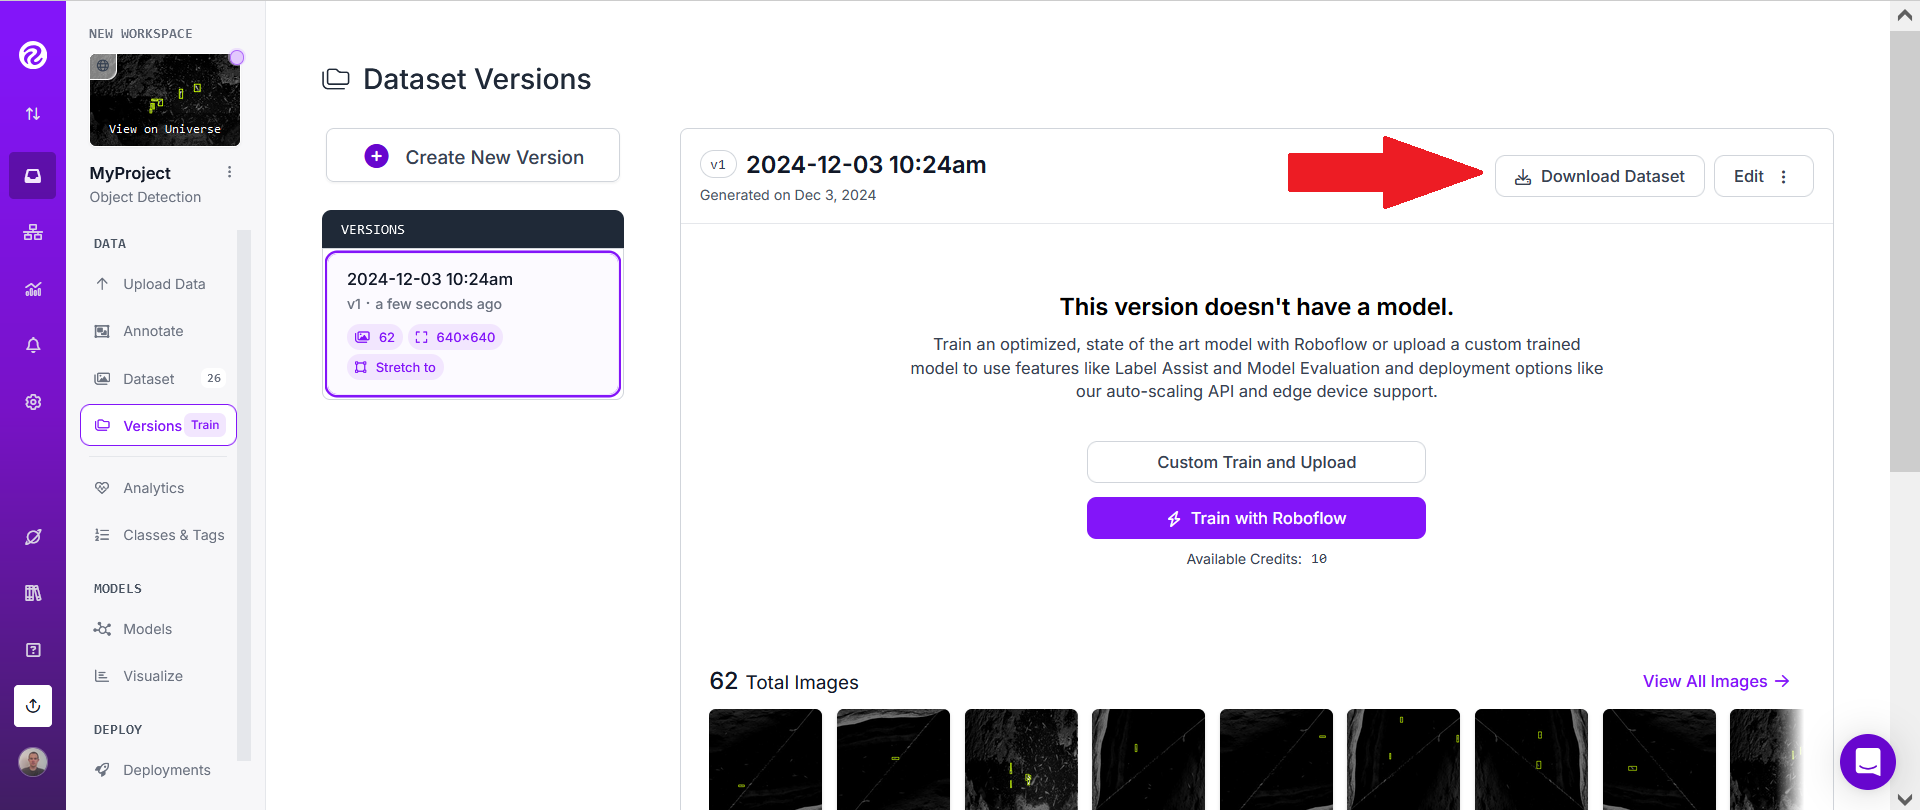
Finally click "Create" (don't change the "Maximum version size").
This may take a few seconds or minutes.
Then click on "Download Dataset".
Choose YOLOv11 and "Show download code" and click "Continue".
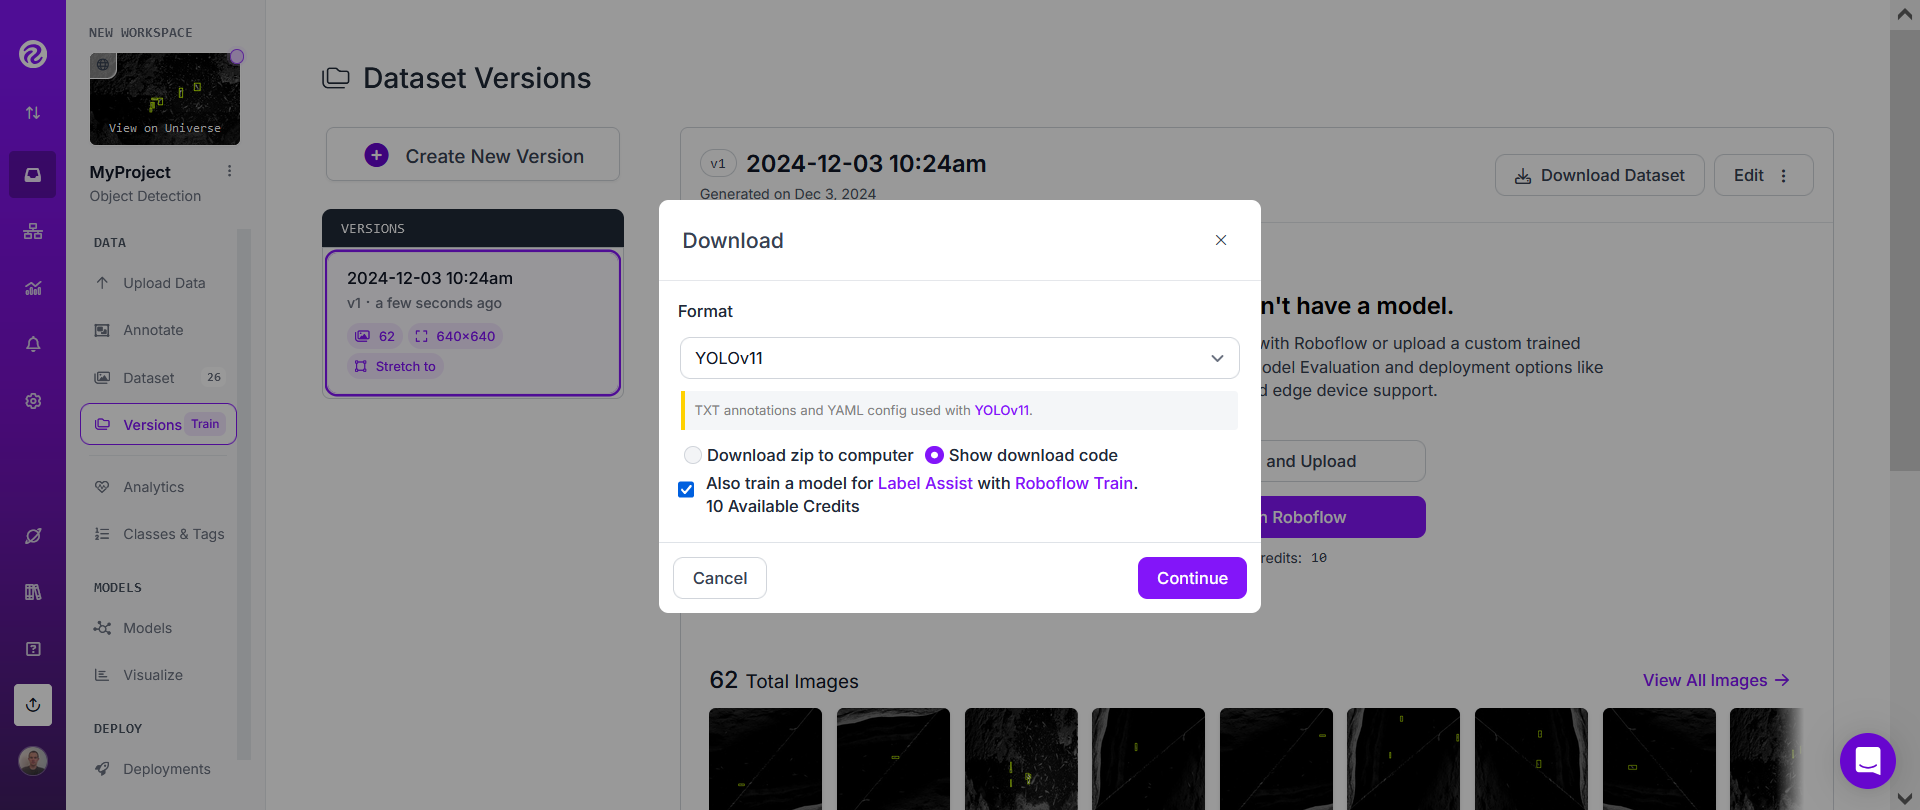
Finally, copy the download code, paste it on a text editor on your computer, and click "Done".
Training a deep learning based model on Google Colab
First open this Google Colab notebook
You may need to log in to a Google account.
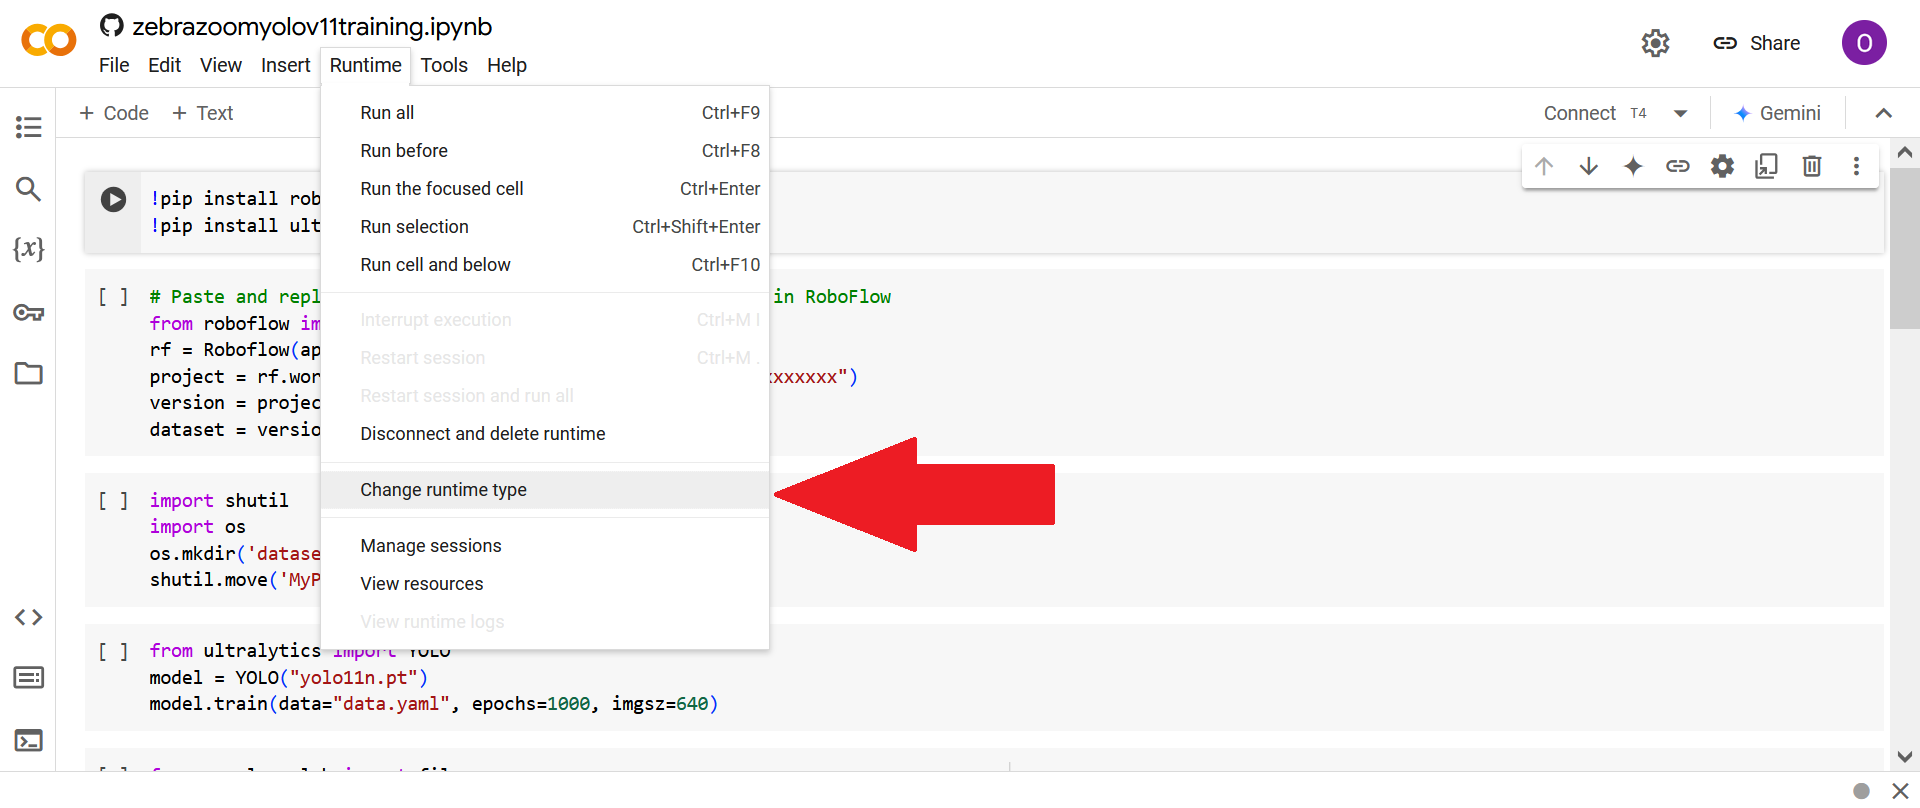
First click on "Change runtype type".
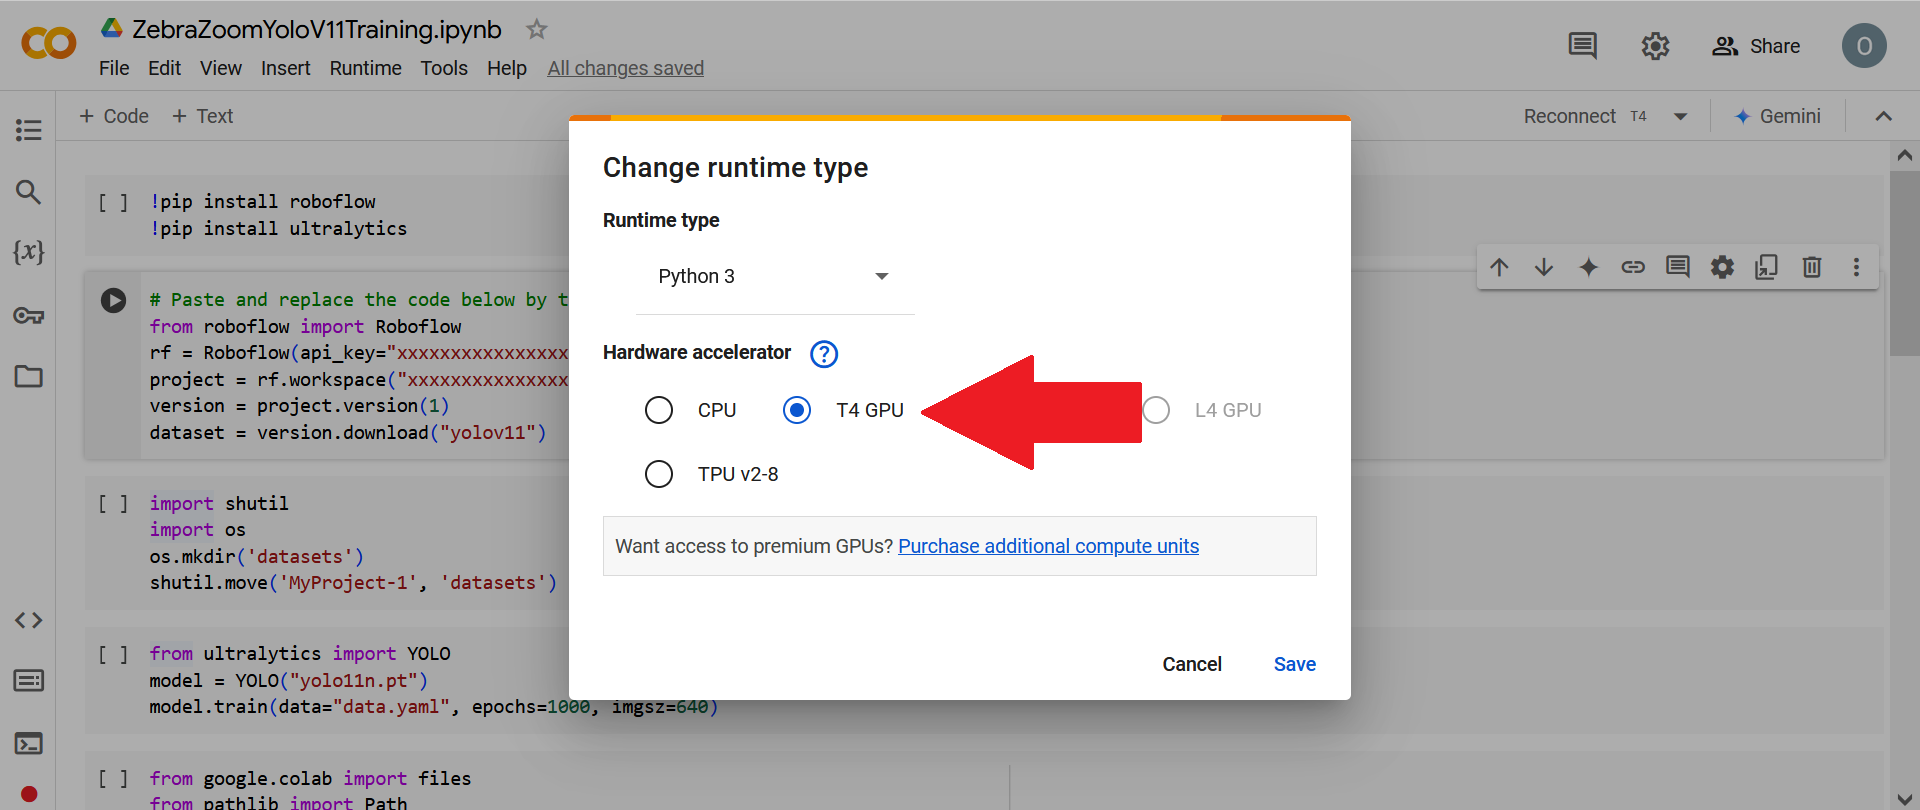
Then click on "T4 GPU" (or on any other GPU type).
Then click on "Connect".
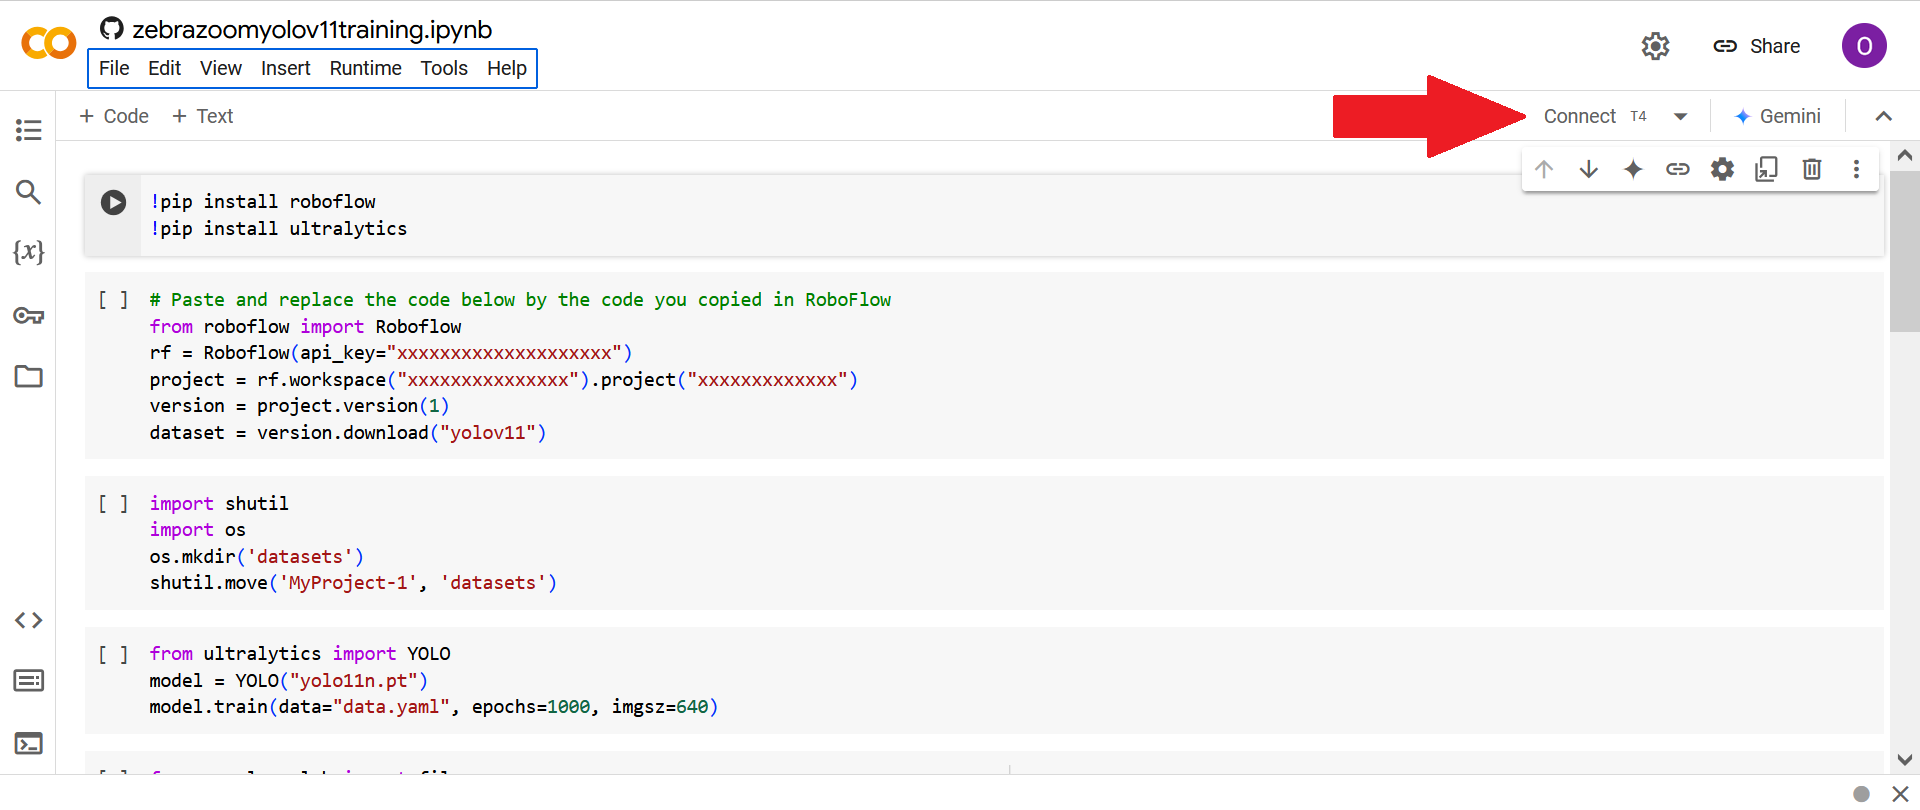
Paste and replace the download code (that you got from the previous section) into the second cell, in order to replace all the "xxxxxxxxxxxxx" by values which will allow you to download the data on Roboflow into Google Colab.
Now launch all cells of the Google Colab notebook.
By default, the network used is set to yolo11n.pt and this is usually a good place to start. However, later on, you can also experiment with using other networks that may sometime offer higher accuracy but slower speed.
Running the last cell will download a .pt file on your computer, which we will need for the next final step.
If everything worked on the first try you can launch this last cell as is. However, if you had to launch the training (seventh cell) several times before it worked, you would need to add a number in the code (3) corresponding to the training run number which you can find in (2).

If you want to do data augmentation through Google Colab / Ultralytics instead of through Roboflow (which may be useful to bypass Roboflow's limitations on dataset size) you can use this Google Colab notebook. Available data augmentations techniques can be found here: data augmentations techniques. Furthermore, if no data augmentation are made through Roboflow (which might be better) dataset size can be increased either without rotations or with rotations.
NB: More advanced scripts (not immediately necessary, for advanced users only, try it only later): if you want to test the impact of different training dataset and YOLO model sizes, you can try using these scripts: Google Colab notebook, Plotting results, Plotting results with error bars.
Running the tracking with ZebraZoom on your computer (no need for GPUs)
First install ZebraZoom ZebraZoom installation guide.
Then download the configuration file.
Open ZebraZoom and click on "Open configuration file folder".
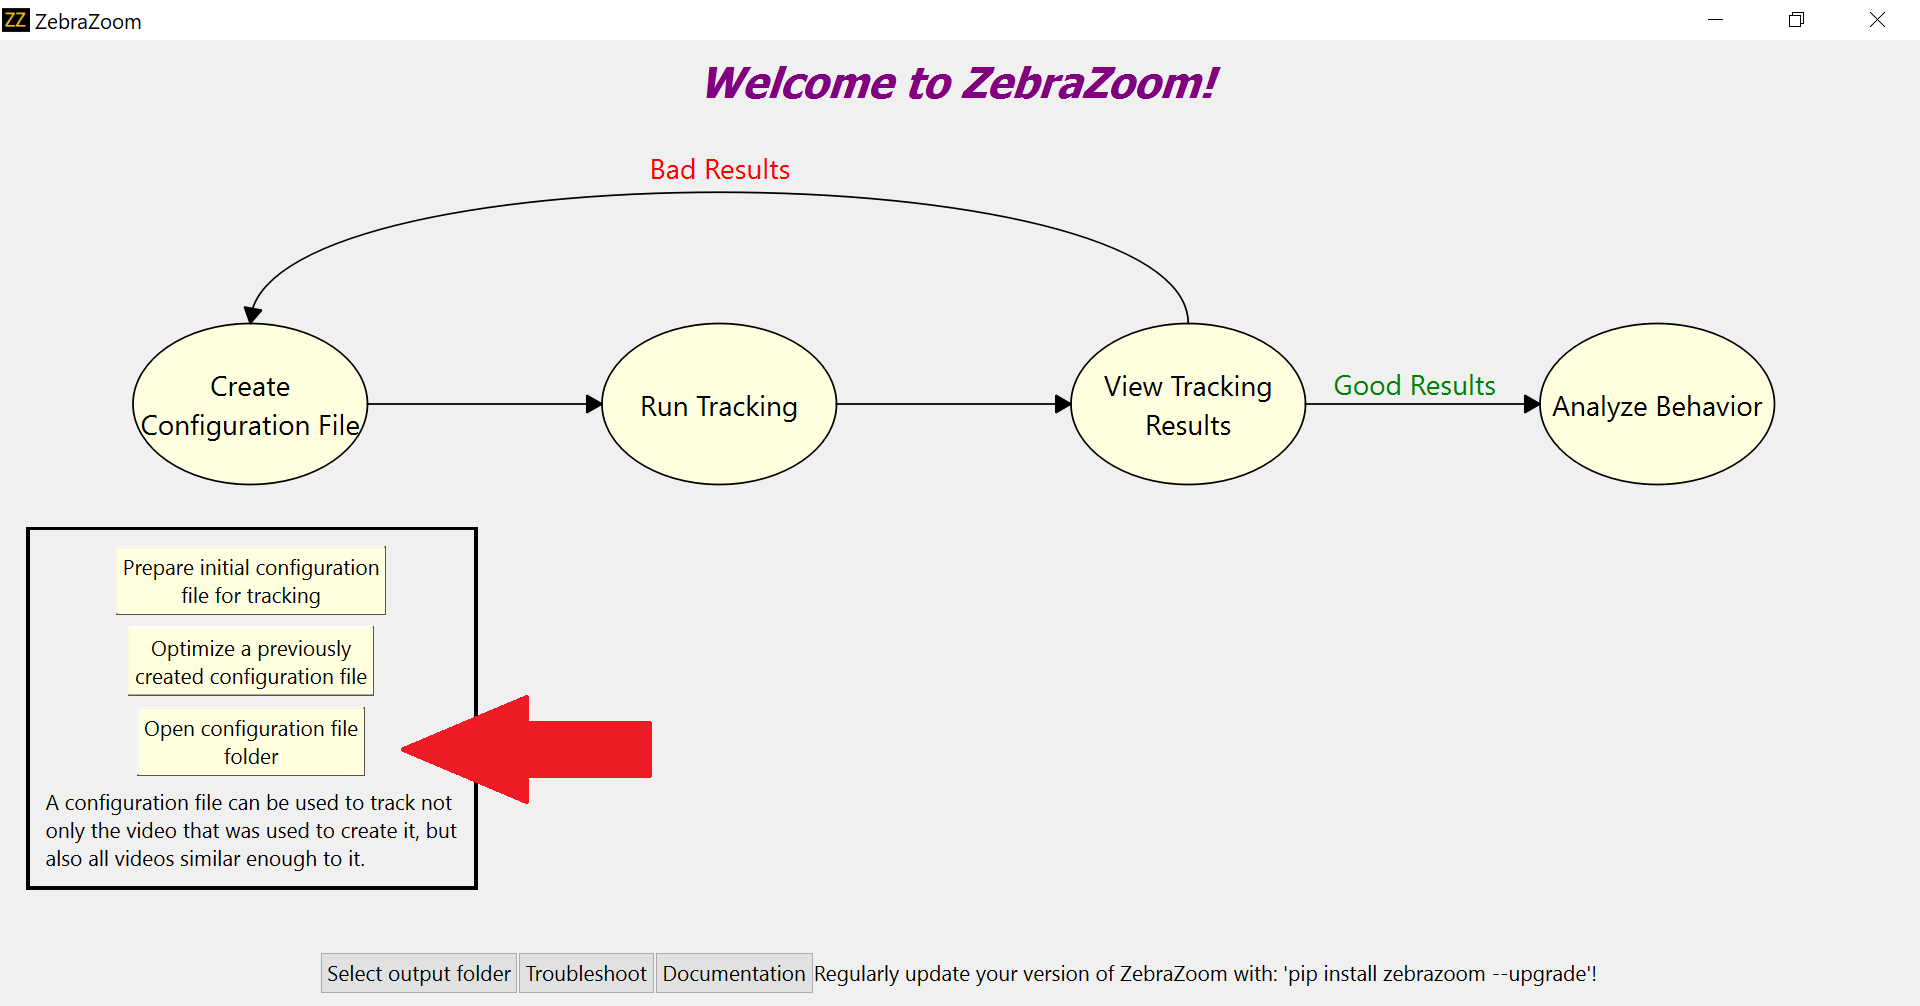
This will open a folder named "configuration". Place the configuration file you've just downloaded as well as the .pt file that was downloaded on your computer in the previous section in that "configuration" folder.
Then open the configuration file in a text editor.
- First change the parameter "nbAnimalsPerWell" to the maximum number of animals present all at once in a frame of the video.
- If you would like bouts of movements to be detected, change the parameter "coordinatesOnlyBoutDetectionMinDistDataAPI" from 0 to a value strictly superior to 0, for example 5 (as is done here. The lower the value of "coordinatesOnlyBoutDetectionMinDistDataAPI", the more sensitive the bout detection will be.
- In some cases, you will need to replace the value of "DLmodelPath" in order for it to contain the full path to the .pt file. For example, you may in some cases need to replace the "model_crossPlatform_compatible.pt" by something like "C:\Users\username\Desktop\ZebraZoom\zebrazoom\configuration\model_crossPlatform_compatible.pt". However, importantly, this won't be necessary in most cases! So to begin, keep this as is, and only change it later on if you see that it can't find the .pt model while running the tracking.
- Finally, you could also try adding "onlyRecenterHeadPosition": 1 in the configuration file to recenter the head position to the darkest point of the fish (instead of having it in the center of the ROI, which will usually be the center of the head) (this feature may not always work however, depending on the situation).
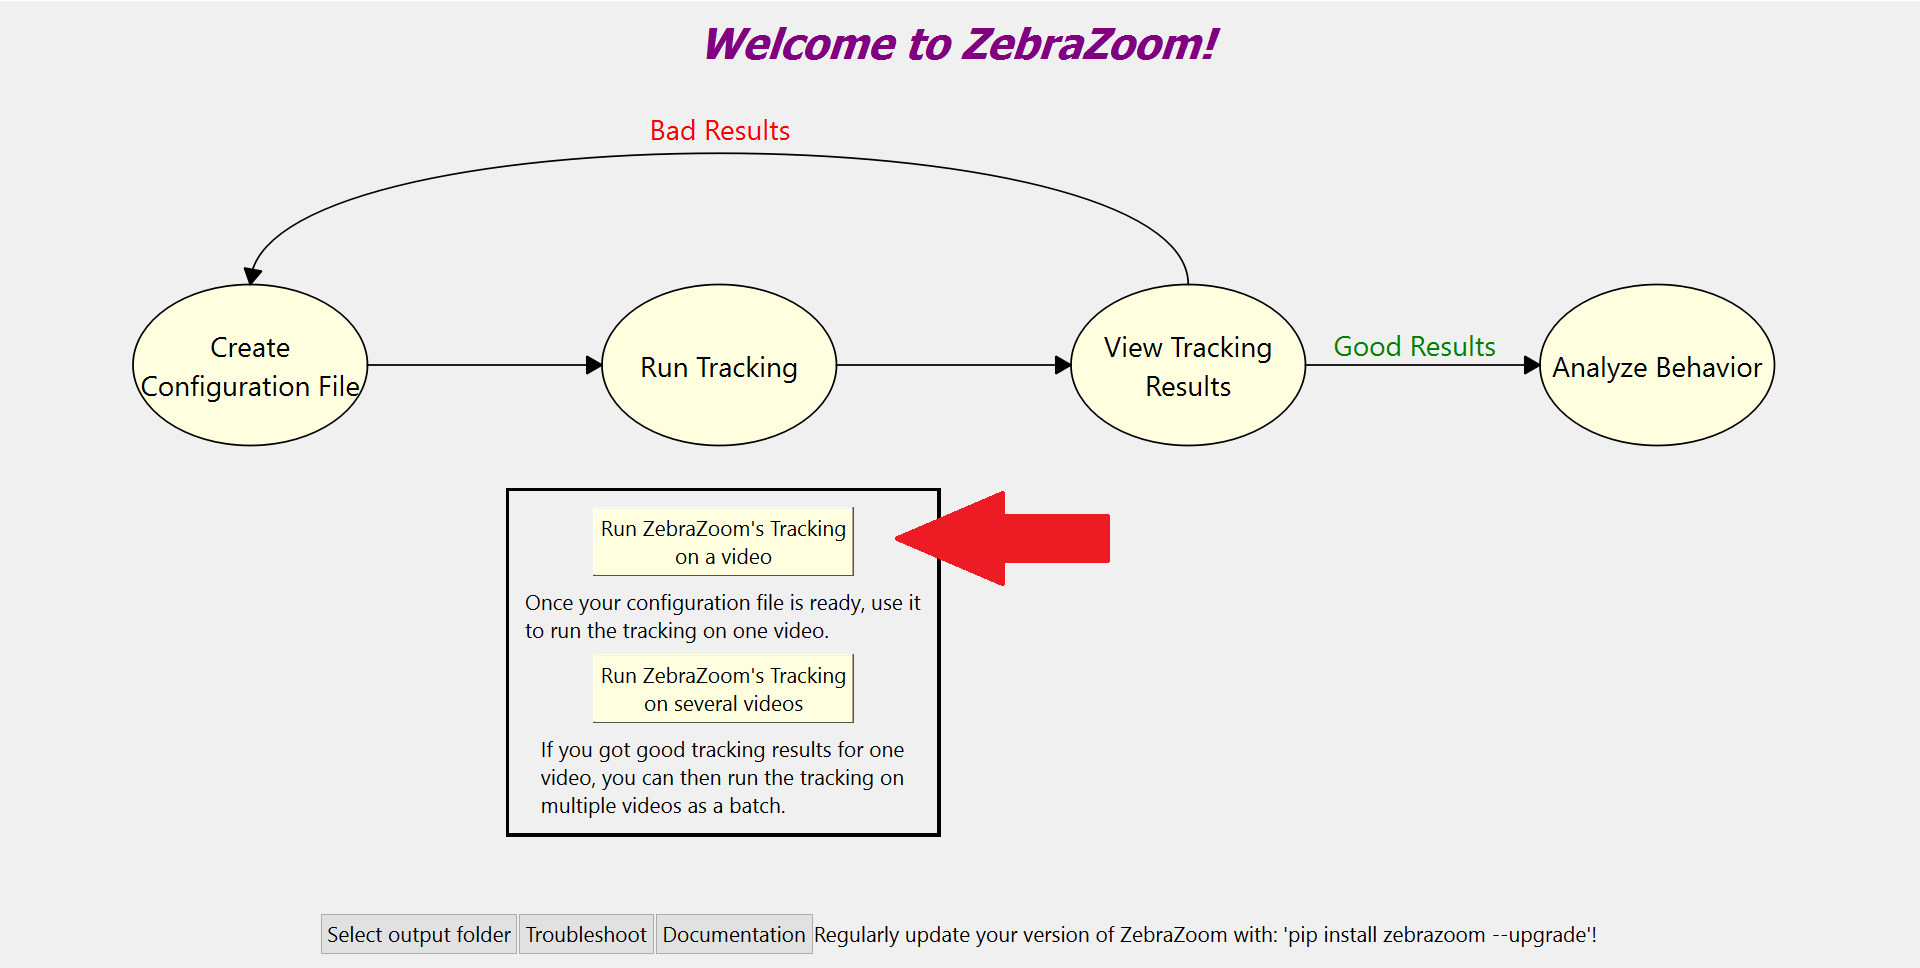
Now launch the tracking using that configuration file as you normally would.
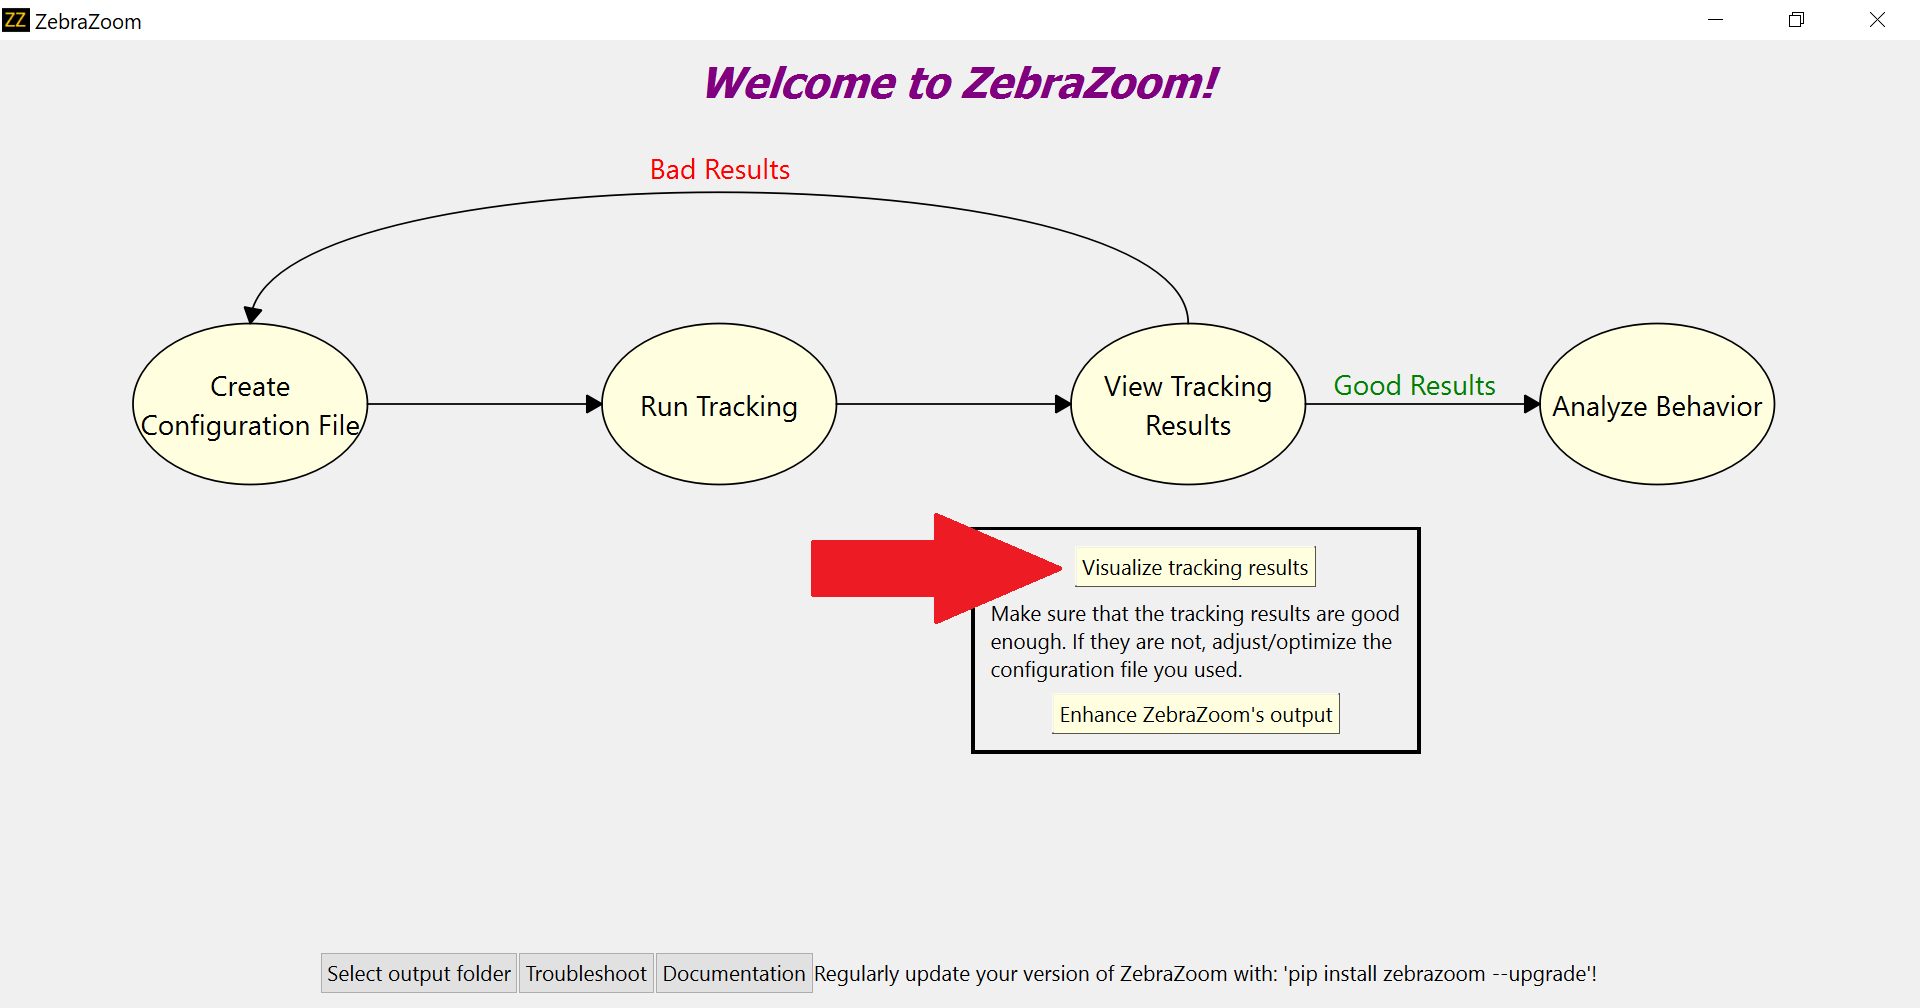
And then verify the results also as you normally would.
If you have any questions or experience any issues with this method, please don't hesitate to contact us at: info@zebrazoom.org