Launching ZebraZoom's tracking on a cluster of computers
Speeding up tracking time by running ZebraZoom on a cluster:
For really long videos, it may be necessary to use a server / cluster of computers to speed up the tracking time of ZebraZoom.
Basic Linux commands to familiarize yourself with:
Linux is usually installed on servers / cluster of computers. You will therefore need to familiarize yourself with basic Linux commands. The commands you will need are:
ls
ls prints all files and directories present in the current folder.
cd directoryName
cd directoryName (you need to replace "directoryName" by the name of the directory you want to move into). "cd .." will go back to the parent directory.
cat nameOfFile
cat nameOfFile will print the content of the file nameOfFile in the terminal.
nano nameOfFile
nano nameOfFile will allow to edit the file nameOfFile from within the terminal. Click on "Ctrl+X" and then "y" to save changes and exit text edition.
ssh username@nameOfServer
ssh username@nameOfServer allows to connect to the server from your local computer. You should type that command from a terminal such as git bash.
scp nameOfFileOnLocalComputer username@nameOfServer:~/
scp nameOfFileOnLocalComputer username@nameOfServer:~/ allows to transfert the file nameOfFileOnLocalComputer to the server from your local computer. You should type that command from a terminal such as git bash.
Important: Tabulation Key:" as much as possible, when typing in file or directory name you should use the Tab key for auto-completing which will save you a lot of time.
Example: Steps to launch ZebraZoom on a server:
The following paragraphs describe an example of how to use ZebraZoom on a server. In the following paragraphs, we will continuously refer to two distinct machines:
-your local computer, which is the computer you use and on which ZebraZoom should be installed
-the server, which is the remote computer or cluster of computers that you access and on which you should have greater computational power) (and where ZebraZoom should also be installed).
Step 1: Configuration file creation:
First create on your local computer a configuration file as you normally would for the videos you want to track.
Step 2: Testing ZebraZoom on your server:
You only need to do this one time to launch ZebraZoom on your cluster!
Log on to your server (from GitBash, or a similar system), with:
ssh username@nameOfServer
If necessary, load python, for instance with:
module load python/3.8
Load the anaconda environment in which ZebraZoom is installed, for instance with:
source activate zebrazoom
If not already installed, install ZebraZoom on that anaconda environment with:
pip install zebrazoom
You can also regularly update the version installed with pip install zebrazoom --upgrade and check the version installed / if it is installed at all with pip show zebrazoom.
Then upload on your server an example video and a configuration file to track with ZebraZoom, this can be done for instance by typing, from your local computer, the following lines in a second git bash (not the one you used to log in the server with ssh as it is already in use):
scp 4wellsZebrafishLarvaeEscapeResponses.avi username@nameOfServer:~/
scp 4wellsZebrafishLarvaeEscapeResponses.json username@nameOfServer:~/
(alternatively and if available, you could also use Windows file explorer to move these two files)
Both the 4wellsZebrafishLarvaeEscapeResponses.avi video and the 4wellsZebrafishLarvaeEscapeResponses.json can be downloaded online:
4wellsZebrafishLarvaeEscapeResponses.avi 4wellsZebrafishLarvaeEscapeResponses.json
You can then test ZebraZoom on your server by typing, into the first GitBash (in which ssh is in use):
python -m zebrazoom ./ 4wellsZebrafishLarvaeEscapeResponses avi 4wellsZebrafishLarvaeEscapeResponses.json
The first line printed by that command will indicate the folder in which the tracking results are saved.
Once the tracking is done, from the main menu of ZebraZoom (on your local computer), click on the button Select output folder (bottom left). When prompted by ZebraZoom to choose the ZZoutput folder, choose the folder previously indicated when launching the tracking on the server (where the tracking results are saved). You will then be able, from the ZebraZoom's GUI that you just launched on your local computer, to see the results of the tracking you launched on the server, by clicking on Visualize tracking results under the section View tracking results of the main menu of the GUI.
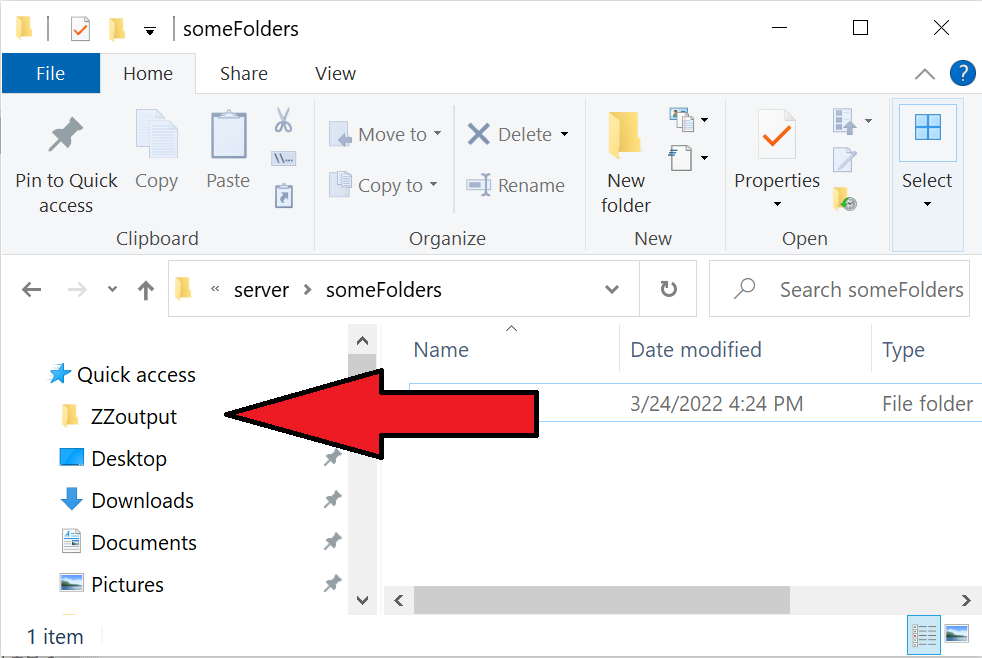
Step 3: Pin to quick access the location of the ZZoutput folder on your server:
If your using Windows on your local computer, open the file explorer and "Pin to quick access" the folder previously indicated when launching the tracking on the server (where the results are saved) referred to in the previous section:

This will be important in the next steps as it will allow you to quickly access that important folder from the left side of the file explorer:
Important: Similarly you should also set in your "Pin to quick access" the folder on the server in which you arrive when you type ssh username@nameOfServer and the folders (or root folder) on the server in which your videos are saved.
Step 4: Pre-calculating the ROIs/wells and/or the tail tip coordinates for head-embedded:
This step is only necessary if you are using the 'grid system' or the 'multiple ROIs chosen at runtime' to identify wells or if you are tracking head-embedded fish!
From the main menu of ZebraZoom (on your local computer), click on the button Select output folder (bottom left). ZebraZoom will prompt you to choose the location of the ZZoutput folder in which the tracking results are saved: choose the location of the ZZoutput folder on your server (the "quick access" system shown in previous steps will make this process easier).
Then, from the GUI of ZebraZoom click on Run ZebraZoom's Tracking on several videos, then on Show advanced options then on the of three buttons relevant to your use case ("head-embedded tail tip", "ROI selection" or "Grid selection"), then choose the videos (on the server) that you want to analyze, then choose the configuration file (on your local computer) that you created during the first step, then click on Run Tracking (green button on the right) then on Launch ZebraZoom on your video(s) and follow the instructions given by ZebraZoom.
This will pre-calculate the ROIs/grid/tail tip coordinates for the first frame and save them on the server in preparation for tracking.
Step 5: Creating the files necessary to launch the tracking:
From the main menu of ZebraZoom (on your local computer), click on Run ZebraZoom's Tracking on several videos, then click on Run ZebraZoom on several videos, then click on Show advanced option then check the box Expert use, then click on Choose videos and choose the videos (on the server) that you want to analyze, then choose the configuration file (on your local computer) you created during the first step, then click on Run Tracking then on Launch ZebraZoom on your video(s) and follow the instructions given by ZebraZoom.
This process will create three files in the folder in which ZebraZoom is installed which will be needed for the next step.
Important: please remember that all the videos you want to analyze must have a different name even if they are in different sub-folders. It will be much more difficult to visualize tracking results and to analyze behavior without following that convention.
Step 6: Launching the tracking on the server with the sbatch command:
First you will need to transfer the three files previously created onto the server. You can do that simply by using the file explorer in windows: this will be much simpler to do if you "Pin to quick access" the folder on the server in which you arrive after typing ssh username@nameOfServer as suggested above. Alternatively, you could also type the three following lines in GitBash:
scp launchZZ.sh username@nameOfServer:~/
scp commands.txt username@nameOfServer:~/
scp configFile.json username@nameOfServer:~/
Then log in to the server with:
ssh username@nameOfServer
First make sure that the three files have been correctly uploaded to the server with the command:
ls
Then launch the tracking with:
sbatch launchZZ.sh
You can then follow the progress of the tracking using the commands:
squeueme
which will show the processes currently running on the server
and with:
cat slurm...
which will print the progress of each process running (you will need to replace the ... above by the exact name of the slurm file, which you can find by typing ls in your command line.
Once ZebraZoom has finished running on all videos, the command squeueme shouldn't print anything (this is a good way of knowing when all tracking processes have finished running.
Important note:
Before launching the sbatch launch.sh command, make sure that you haven't previously typed any of these two lines in the server:
module load python/3.8
source activate zebrazoom
after initially opening the connection with ssh username@nameOfServer. If you have, exit your current session by typing exit into the terminal, and then reconnect into the terminal with ssh username@nameOfServer
Important note 2:
If after launching sbatch, you realize that you launched the wrong script or that something is wrong with the script you launched, you can stop the processes that you just launched by: First typing squeueme in your terminal to find the job ids of the processes you launched, and then by cancelling every process with the command scancel jobid (you will need to replace jobid by the ids you found with squeueme).
Step 7: Visualizing/verifying tracking results:
From the main menu of ZebraZoom (on your local computer), click on the button Select output folder (bottom left).
ZebraZoom will prompt you to choose the location of the ZZoutput folder in which the tracking results are saved: choose the location of the ZZoutput folder on your server (the "quick access" system shown in previous steps will make this process easier).
From the main menu of the GUI, click on Visualize ZebraZoom's output, from that page you will then be able to visualize the tracking results.
Step 8: Analyzing behavior:
From the main menu of ZebraZoom (on your local computer), click on the button Select output folder (bottom left).
ZebraZoom will prompt you to choose the location of the ZZoutput folder in which the tracking results are saved: choose the location of the ZZoutput folder on your server (the "quick access" system shown in previous steps will make this process easier).
From the main menu of the GUI, click on Analyze ZebraZoom's outputs and follow the instructions to analyze your videos.